SAML: Using Okta, OneLogin, and other identity providers
SAML: Using Okta, OneLogin, and other identity providers
SAML Identity Providers come in all shapes and sizes. You might need to tweak your SecureBlackbox SAML SP server to make third-party providers work with it in the best possible way. This help article aims to provide some guidance on configuring third-party IdPs and setting up your SBB-powered SP server to work with them. The setting therefore comprises of two primary players: a third-party IdP service (such as Okta) and your application that uses SecureBlackbox SAMLSPServer class to consume the external IdP services.
Note that SAML ecosystem is developing rapidly, and some facts given in this article may have become obsolete by the time you read it. While we are doing our best to keep this information relevant, please allow for a certain degree of error. This data is correct as of January 2022.
In the examples below we assume that your SP server runs at http://myserver.com, with the AssertionConsumerService and other endpoints published at the /sp subpath (e.g. http://myserver.com/sp/AssertionConsumerService). If you would like to use different setup, please alter the settings accordingly. You might need to alter them at both sides, SP and IdP.
Okta
Okta supports SAML 2.0. The integration process is very straightforward, and is covered in this article: https://help.okta.com/en/prod/Content/Topics/Apps/Apps_App_Integration_Wizard_SAML.htm . You will need an Okta development account to create SAML integrations.The Okta IdP endpoint can be configured manually without the need for an SP metadata file. Pass the URL of the Assertion Consumer Service that you have set up in your SP endpoint as the "Simple Sign on URL" setting:
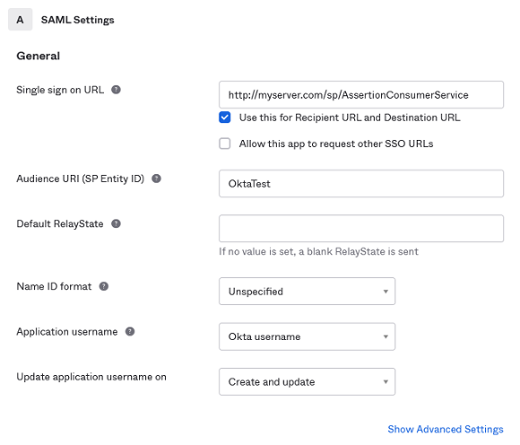
If required, please expand the additional settings section by clicking on the Show Advanced Settings link. This lets you set up specific security mechanisms to use. It is a good idea to download the Okta on this stage, as you may need it later for validating signatures.
When asked whether you are a customer or a software vendor, tick the radio button indicating that you are a software vendor looking to integrate your app with Okta.
Having completed the application setup, please download the IdP metadata by clicking on the corresponding link:
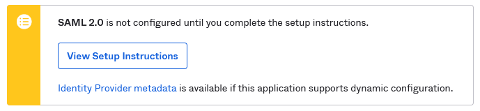
You will need to pass this file to the LoadIDPMetadata() method of your SP server to let it know about the Okta IdP settings.
Finally, please register some user accounts with your new SAML integration by navigating to the Assignments tab and clicking the Assign to People button. You need at least one user account registered with the integration (otherwise you will have no users who could sign in to your SP!)
This completes the IdP setup. Please now set up your SP server as below. This is one of the possible setups;
Okta is quite flexible and generally will accept a number of integration configurations:
  server.SPToIDPBinding = csbtRedirect;
  server.AssertionConsumerServiceBindings = "POST";
  server.PreferredIDPToSPBinding = csbtPOST;
  server.SingleLogoutServiceBindings = "Redirect,POST,Artifact";
  server.SignAuthnRequests = true;
We have only indicated the integration settings that matter for Okta. Remember to set other properties (such as AssertionConsumerService or SigningCertificate) as required.
You are now ready to start the SP server and try the connection. When you navigate to a protected resource in your browser (e.g. http://myserver.com/picture.jpg), the SP server should redirect you to the Okta portal that will present you with a login form. After receiving valid credentials from you, the portal will generate an authentication assertion and redirect you back to the SP web site - which should now display the requested resource.
OneLogin
OneLogin has limited support for SAML. Some types of accounts only have access to SAML 1.1-based IdP, which is quite outdated and does not provide many features that a newer SAML 2.0 provides. Yet, you still can use it with SecureBlackbox SP server to build identity integrations. You will need a OneLogin developer account to create SAML integrations.In your Onelogin dashboard, go to Apps, then Add Apps. Search for "SAML" string and select the SAML 1.1 Test Connector (Advanced) from the list. Having added the app, go to the Configuration tab and set up the SP URLs. You can use the same URL for all the ACS endpoints:
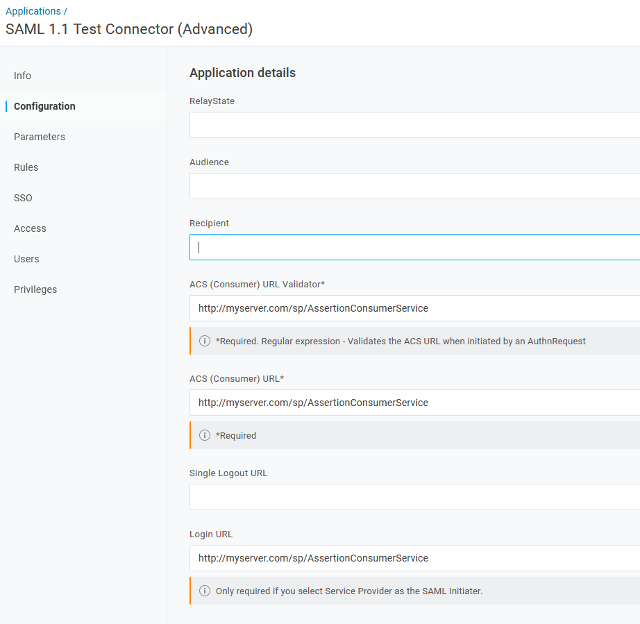
You can leave the remaining properties at their default values. Download the IdP metadata XML by clicking the More Actions button at the top of the page and picking SAML Metadata entry from the list. You need to pass this metadata file to the LoadIDPMetadata() method of your SP server object to share the IdP settings with it.
Remember to add at least one user account for your integration to work.
Now, please set your SP server up as below. This is not the only possible setup: you can
tune up both the IdP and SP settings to enable encryption or tune up signature settings.
  server.SPToIDPBinding = csbtRedirect;
  server.AssertionConsumerServiceBindings = "POST";
  server.PreferredIDPToSPBinding = csbtPOST;
  server.SingleLogoutServiceBindings = "Redirect,POST,Artifact";
  server.SignAuthnRequests = true;
Remember to make sure the AssertionConsumerSetting of your SP server matches the one that you configured in your OneLogin app.
You can start the SP server now and try requesting a protected resource. If everything has been set up right, you should be redirected to OneLogin authentication portal that will ask you for credentials. Once you have provided your credentials, the portal will redirect your browser back to the SP server.
Azure AD
Microsoft Azure Active Directory service supports SAML 2.0. One thing that makes it different is that the Azure IdP service does not support XML metadata files as means for provision of SP and IdP endpoint settings. The SAML settings therefore need to be configured manually (read on).Microsoft provides excellent guidance into registering your application with Azure ID and configuring it:
https://docs.microsoft.com/en-us/azure/active-directory/manage-apps/add-application-portal
https://docs.microsoft.com/en-us/azure/active-directory/manage-apps/add-application-portal-assign-users
https://docs.microsoft.com/en-us/azure/active-directory/manage-apps/add-application-portal-setup-sso
The process, however, is very slightly different for non-gallery applications. Specifically, the Enable Single Sign-on feature is not available through the route suggested in the article. Instead, the configuration wizard suggests that you use Dashboard - Azure Active Directory - App Registrations setting instead. This does the job.
Below we narrowed down a summary of steps that you need to take to register your application with Azure AD.
- Create a new application in Azure AD console: go to Enterprise applications; then click New Application, and then Create your own application.
- Choose Register an application to integrate with Azure AD (App you are developing) from the three options offered.
- Choose the types of users that can use this application, as required.
- Add any user accounts that you would like to manage with this IdP.
- On the Authentication tab of your application, configure the Redirect URI to point to the AssertionConsumerService endpoint of your SP:
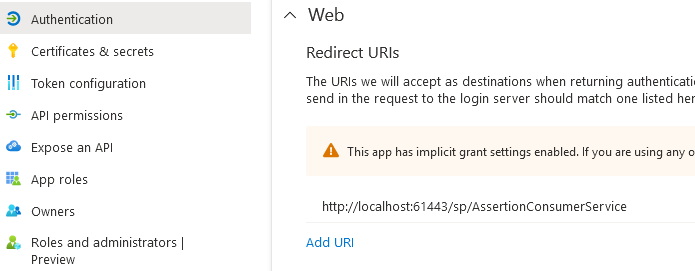
Note that Azure only accepts ACS addresses that begin either with https:// or with http://localhost. While other IdP services do tolerate local IP addresses in the URLs (such as http://127.0.0.1), you must use the domain-based addressing with Azure.
You can also provide the logout URL. This should be public, i.e. accessible from the Azure AD service.
- Take a note of your application's SAML endpoints by clicking on the Endpoints button at the top of your application's setting page.
Although Azure lists a number of endpoints, only the last two make sense for SAML. They are identical:

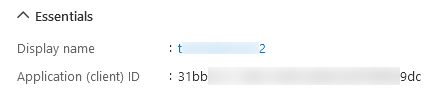
- Also, take a note of the ID that Azure has assigned to your application. You can get it from the Application (client) ID
entry in the Essentials tab of your application's settings.
- This completes the IdP setup. The rest is about configuring the SAML SP server in your application. As we already mentioned,
Azure does not provide an XML metadata file, so we will need to set up the parameters in code. Here are the parameters that you
need to set up (remember to set up the primary SP properties too, such as URL, AssertionConsumerService, and signing certificate):
  server.SPToIDPBinding = csbtRedirect;
  server.AssertionConsumerServiceBindings = "POST";
  server.PreferredIDPToSPBinding = csbtPOST;
  server.SingleLogoutServiceBindings = "Redirect,POST,Artifact";
  server.SignAuthnRequests = true;

  server.Issuer = "31bb...9dc"; // your application ID as shown in Azure dashboard
  server.Config("IDPSSO=https://login.microsoftonline.com/3269...8d7/saml2"); // the SAML endpoint as shown in the dashboard
SPID
SPID (https://demo.spid.gov.it) is a quite demanding Identity Provider. Regulated by Italian government, it requires a number of adjustments to be made to the SP server component for it to be accepted. Still, with careful tune-up you can still make it work for you.Note: you can only let SPID know about your SP server by passing your metadata to it. At this time we have no information whether there exists an alternative (manual) way of doing it. You can only pass the metadata as an URL at your SP - which means the SP must be up and running by the time you are registering it with the SPID IdP.
The overall setup procedure consists of the following steps:
- (pre-requisite) Grab the IdP metadata XML by clicking the Scarica Metadata IdP button. You will need to pass it to the LoadIDPMetadata() method of your SP server object.
- (pre-requisite) Generate a signing certificate compatible with SPID. The easiest way to do that is to use the gencert-private.sh script available at https://github.com/italia/spid-compliant-certificates. Note that the certificate must mention the real URL of your Service Provider (the IdP will reject your requests if it does not match).
- When setting up the server, make sure to load the certificate you have generated using a CertificateManager object and assign it to the SigningCertificate and MetaSigningCertificate properties.
- Adjust the server properties in accordance with the snippet below (all the settings are mandatory; adjust values as required):
server.SPToIDPBinding = csbtRedirect; server.AssertionConsumerServiceBindings = "POST"; server.PreferredIDPToSPBinding = csbtPOST; server.SingleLogoutServiceBindings = "Redirect,POST,Artifact"; server.SignAuthnRequests = true; server.SignMetadata := true; server.Config("OrganizationName=My Organization"); server.Config("OrganizationDisplayName=My Organization"); server.Config("OrganizationURL=http://myserver.com"); server.Config("OrganizationLang=it"); server.Config("SigDigestMethod=http://www.w3.org/2001/04/xmlenc#sha256"); server.Config("SigMethod=http://www.w3.org/2001/04/xmldsig-more#rsa-sha256"); server.Config("UseZeroIndexForDefaultServices=true"); server.Config("WantAssertionsSigned=true"); server.Config("ContactPerson=Company=My Organization, sro;Email=myserver.com;Type=other;Extension.https://spid.gov.it/saml-extensions.VATNumber=IT122345678;Extension.https://spid.gov.it/saml-extensions.Public="); - Start the SP server. Check that it publishes metadata correctly by navigating to http://myserver.com/sp/metadata in your browser. If you can see the metadata XML, you are all good and ready to register your service with the IdP.
- Go to the SPID page (https://demo.spid.gov.it/) in your browser and click the Registra Metadata Service Provider button. Paste the metadata URL (http://myserver.com/sp/metadata) in the Metadata URL box and click the Download button. The IdP should now download the metadata from your SP endpoint and process it.
- Note: With the demo endpoint the registration process ends here. Unfortunately, not being an Italian entity, we cannot test the registration any further. Still, most of the coupling work has been done by this stage. The only task that remains is setting up the users at the IdP side and testing your SP by navigating to one of the resources it protects.
Trying and testing your SAML SP setup
SAML SP endpoints are expected to be available publicly on the Internet to be reachable by their IdP counterparts. This sometimes makes it difficult to test them, as development systems are often hidden from the online public by routers and firewalls.One of the options to test SP endpoints is to relay a port on the public router to a locally running SP endpoint. There are a few tools and tips that may be helpful in that regard.
- Dynamic DNS (DDNS) services can bind a fixed DNS name to the volatile public IP address of your router. Instead of referencing your SP by the IP address of the router, you can get a name like myownsp.ddns.net and have the DDNS service deal with the IP address changes.
- To let "outsiders" get to an SP service running on your development system you need to relay, or forward, a public port on the router to the listening port on your development system. The common way of doing that is called "port forwarding", which is configurable in the router settings (look for "port forwarding", "firewall", or "NAT" settings). Note that the public port number does not need to match the port opened on your development system: for example, you can forward a public port 80 (HTTP) on the router to port 15080 on your system. When the IdP makes a request to myownsp.ddns.net:80, the router forwards that request to port 15080 on your development system (e.g. 10.0.1.75:15080). That happens transparently to the IdP, which thinks it is talking to myownsp.ddns.net:80.
- An alternative way of letting outsiders access your system is by using application-layer forwarding. One example of that is
a service called localhost.run. This service lets you create a reverse SSH tunnel to your SP endpoint and makes it available for
others as a subdomain at localhost.run service:
// OpenSSH
C:\> ssh -R 80:localhost:15080 nokey@localhost.run

// Putty
C:\> PLINK.EXE -ssh -l nokey -R 80:localhost:15080 localhost.run

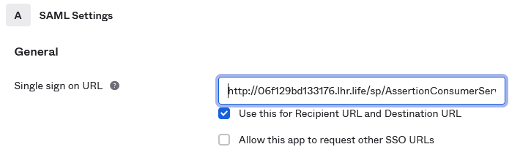
Everybody, including public IdPs, can now access your local SP endpoint by sending requests to http://06f129bd133176.lhr.life. You can now configure the IdP to use this address too:
- Understand your ports! As port forwarding involves different port numbers, please make sure you sort them out right. Make sure
the IdP knows about your public port (80 in the above example), not your private port (15080). This is particularly
important where you provide the SP details to the IdP through the metadata file. The metadata that the SP component generates
uses its Port setting - which is normally assigned to the private port on your development system. If the public port number that
you intend to use is different to your private port number, please make sure you pre-generate the metadata file with the public
port number before you start the server:
  // setting up primary server properties
  server.URL = "http://myserver.com";
  server.AssertionConsumerService = "/sp/AssertionConsumerService";
  server.SPToIDPBinding = csbtRedirect;
  ...

  // setting the public port number
  server.Port = 80;

  // exporting metadata that mentions port 80
  server.SaveMetadata("my_metadata.xml");

  // switching the port to actual private number
  server.Port = 15080;

  // starting the server
  server.Start();