Using PKI Agent
PKI Agent runs on a user's local system and offers signing services through a REST API. Web applications and applications running on the local system can make requests to this REST API in order to create digital signatures using system certificates.
When a signature is requested, PKI Agent will display a prompt so that the user can approve the signing request and choose the certificate to use for the signature. During a signing operation, the data to be signed is sent to PKI Agent, and the signature is created locally and sent back in the response. The private key associated with the signature remains on the local system and is not exposed.
Getting started with PKI Agent involves two steps:
- Use the PKI Agent interface to choose which certificates should be available via the API
- Create API requests in your web application (or other signing context) according to PKI Agent's REST API
For more information on the REST API, see Using the REST API.
Adding Certificates to PKI Agent
When PKI Agent is running, you can find its icon in the system tray. To open the certificate sharing window, double-click the icon or right-click and choose Certificates....
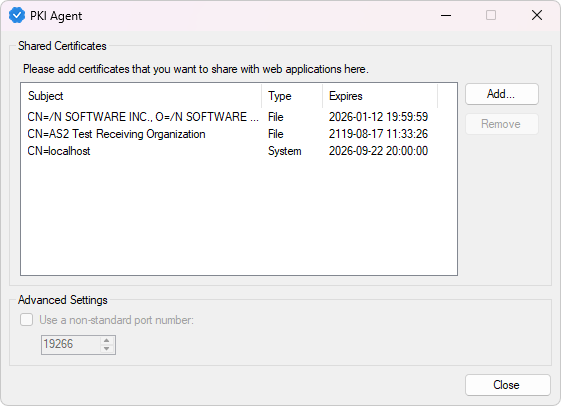
To add a new certificate, click the Add... button. A new dialog window will open where you can choose the type of certificate you want to load and then enter its details:
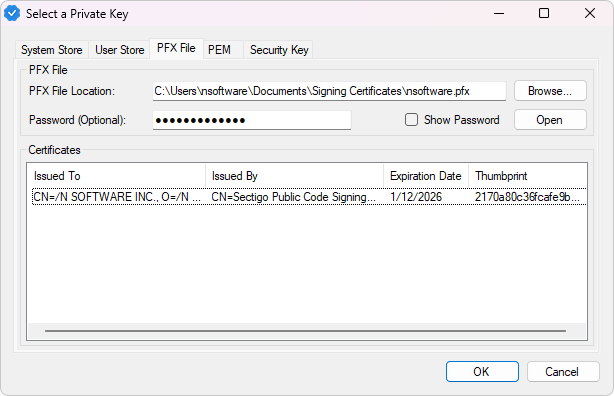
PFX and PEM Files
For PFX or PEM files, select the PFX File or PEM File tab as appropriate. Browse to the location of the file on your system, enter the password, and click Open to open the file. For a PFX file, choose the specific certificate you want to use from the list before clicking OK.
Windows Certificate Stores
To use a certificate from either the system certificate store or the current user's certificate store, navigate to either the System Store or User Store tab and select the desired certificate from the list.
Security Keys / PKCS#11
For hardware tokens, go to the Security Key tab and browse to the PKCS#11 driver provided by your hardware token manufacturer. This driver may be installed with tools provided by your hardware token manufacturer or may be provided as a separate download. For example, the "SafeNet Authentication Client" software used by many certificate authorities will install a PKCS#11 driver at C:\Windows\System32\eTPKCS11.dll.
Once you have added all the certificates you want to use with PKI Agent, close the window, right-click the PKI Agent icon in the system tray, and choose Start to start the server.
Authorizing a Signing Request
When an application makes a signing request, PKI Agent will display a dialog to the user showing both a code and an application name.
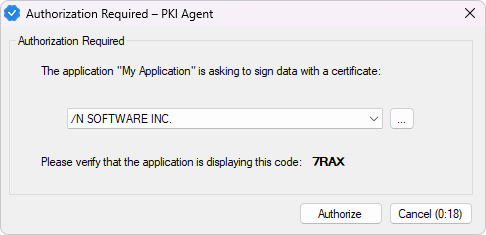
On that window, verify that both the code and application name match the values displayed in the web application, then use the drop-down menu to select the certificate to sign with and click Authorize. If you click Cancel or if the 30-second timer expires, the request will be denied.
You can also use the ... button in the authorization window to open the certificate selection dialog and choose a certificate from your system that isn't on the list. The timer will pause while you are selecting a certificate, and the certificate you choose will remain in the list for future requests.
Additional Settings
Settings for the PKI Agent service are stored at HKEY_CURRENT_USER\SOFTWARE\nsoftware\PKIAgent\24\Services\{GUID}. This include typical settings that are managed through the UI, as well as additional settings which can only be set by modifying the registry key directly.
The following values can be configured within the HKEY_CURRENT_USER\SOFTWARE\nsoftware\PKIAgent\24\Services\{GUID} registry key:
Registry Keys
The following values can be configured for the service:
| Name | Type | Description | ||||||||||||
| AllowedClients | String | This setting defines a comma-separated list of host names or IPv4 addresses that may access the server. When a client connects, the client's address is checked against the list defined here. If there is no match, the client will be disconnected. The wildcard character "*" is supported. The default value is "*" and all connections are accepted. | ||||||||||||
| AllowedTimeSkew | DWORD | Specifies the maximal deviation, in milliseconds, of the timestamp retrieved from the request from the current time. This is a countermeasure for replay and other types of attacks. The default value of this setting is -1 (no time deviation checks). Consider enabling it if using PKI Agent in less safe environments, such as where AllowedClients includes non-localhost addresses. | ||||||||||||
| EnableTLS | DWORD | Whether or not to enable TLS for incoming connections. | ||||||||||||
| LocalHost | String | The localhost IP address. | ||||||||||||
| LogFile | String | The path to the log file. | ||||||||||||
| LogMode | DWORD | This registry key controls the level of log messages. Possible values are:
| ||||||||||||
| LogToFile | DWORD | This registry key controls whether log messages are written to a file. | ||||||||||||
| Port | DWORD | The port at which the service will listen for incoming connections. | ||||||||||||
| PromptLifeTime | DWORD | The time period, in milliseconds, during which requests with repeated prompt (PIN) values will be automatically rejected. This is a counter-replay measure. The default value is 120000 (two minutes). | ||||||||||||
| TLSCertFingerprint | String | The fingerprint of the service's TLS certificate. For instance 39C57481E978114FE7F164EB4E654B6B87787377. | ||||||||||||
| TLSCertLocation | String | The path to the service's TLS certificate. | ||||||||||||
| TLSCertPass | String | The password for the service's TLS certificate. | ||||||||||||
| TLSCertValue | String | If the type of certificate is a PEM string, then this registry key is used to store that string. | ||||||||||||
| UseAsSystemService | DWORD | This registry key indicates whether the sharing service will run as a system service or a regular background process. This is an informational record; changing it in the registry will not affect the startup mode. |