Security
General Security Notes
PKI Proxy enables remote code and document signing using centrally stored keys. Multiple layers of security protect your keys and data.
Secure at Rest
Your private keys never leave their storage location. Whether your private key resides in a file, the Windows certificate store, or on a USB token or in a hardware security module (HSM), the key is never exported from its original location. PKI Proxy communicates with HSMs directly, allowing it to perform security operations without exposing the signing key.
Any sensitive data used by PKI Proxy are encrypted using DPAPI and stored securely in the registry. Only the profile owner can decrypt this data. PKI Proxy settings are stored in the registry at HKEY_CURRENT_USER\SOFTWARE\nsoftware\PKIProxy. The Users key makes use of a Credential string value which holds the DPAPI encrypted user's password when the authentication type is set to Basic or Secret Key. This is not applicable to NTLM. The Certificates key makes use of a Credential string value which holds the DPAPI encrypted certificate password (for file-based certificates) or the PIN for HSM-based private keys. Additionally, the server's TLS certificate password is DPAPI encrypted and stored in the TLSCertPass string value.
Secure in Transit
All data exchanged between PKI Proxy and a connected client are encrypted using Transport Layer Security (TLS). Whether the client is the included PKCS#11 driver, the included KSP module, or a direct connection using the Web API, the communication is protected by TLS.
Access Control and Authentication
Users must authenticate to PKI Proxy in order to perform any operations with the shared certificates. Users are created within the PKI Proxy application and can be assigned any of the following authentication methods:
| Secret Key | A pre-shared secret key is used along with the specified user. Each request and response is individually authenticated using a signature scheme. |
| HTTP Basic | Standard HTTP Basic authentication is performed using the defined user and password. |
| HTTP NTLM | HTTP NTLM authentication is performed. When adding a user in the PKI Proxy application, choose the current Windows user or select another existing user. |
When a certificate is shared, only the users which have been allowed access to that specific certificate may perform operations with it. User access can be granted or modified from the PKI Proxy application on the Certificates tab.
The application also creates a detailed log of all operations, which can be configured on the Settings tab.
Running PKI Proxy
Getting Started
The PKI Proxy application controls which keys are shared, and which users have access to the shared keys. Run the PKI Proxy application by following the links in the start menu, or by running PKIProxy.exe from the installation directory. The Server Configuration page provides details about how to enable TLS, share a certificate, and manage users.
Clients can access PKI Proxy from local or remote locations using the included PKCS#11 driver, configuring the included Key Storage Provider (KSP), or by using the Web API directly.
In most cases, the KSP is the simplest mechanism to enable remote access, since certificates will be visible and usable from the Windows certificate store on the client machine. The Client Configuration (KSP) page provides additional details about KSP configuration.
The cross-platform PKCS#11 driver supports Windows, Linux, and macOS and provides an alternative access mechanism which only requires copying a few files to the client machine. The Client Configuration (PKCS#11) page provides additional details about PKCS#11 configuration.
Server Configuration
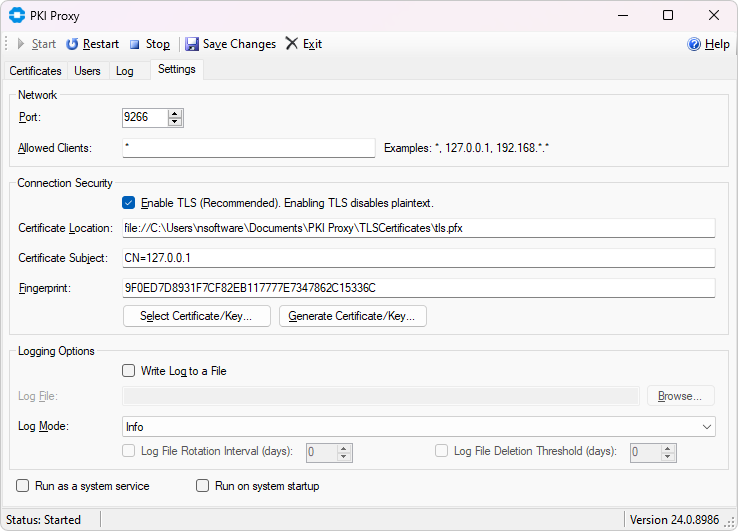
Configuring the Server
The PKI Proxy Service is responsible for making local signing keys available to applications residing outside the system. The Settings tab contains settings for the server itself. You can enable or disable TLS, generate or select a TLS certificate, and choose which port the server will use.
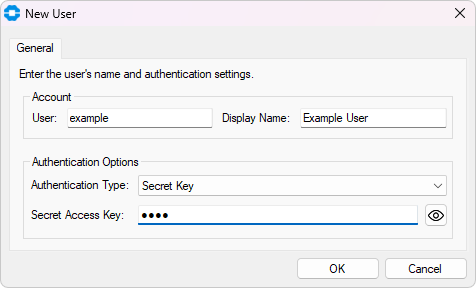
Managing Users
The list of users that may access PKI Proxy can be managed on the Users tab. Click 'New...' to create a new user. Users must authenticate to PKI Proxy in order to perform any operations with the shared certificates. Users are created within the PKI Proxy application and can be assigned any of the following authentication methods:
| Secret Key | A pre-shared secret key is used along with the specified user. Each request and response is individually authenticated using a signature scheme. |
| HTTP Basic | Standard HTTP Basic authentication is performed using the defined user and password. |
| HTTP NTLM | HTTP NTLM authentication is performed. When adding a user in the PKI Proxy application, choose the current Windows user or select another existing user. |
When a certificate is shared, only the users which have been allowed access to that specific certificate may perform operations with it. User access can be granted or modified from the PKI Proxy application on the Certificates tab.
Sharing a Certificate
PKI Proxy allows selecting PFX files, certificates installed to the Windows certificate store, and certificates stored on hardware tokens (PKCS#11). To share a certificate, navigate to the Certificates tab. Click the 'New...' button to select a certificate to share. This will open a dialog window where you can select the certificate.
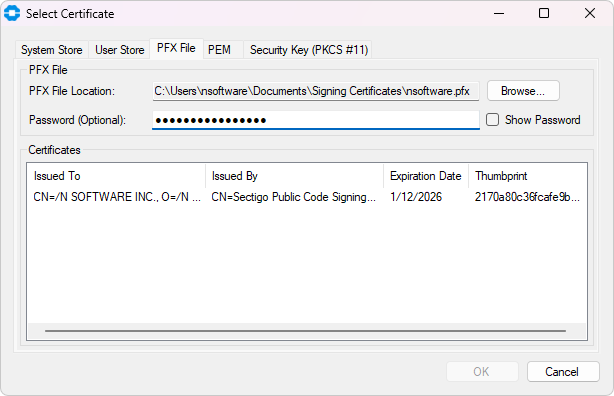
PFX File
For PFX files, simply select the PFX File tab and browse to the PFX location on disk, enter the password and choose the appropriate certificate from the list.
Windows Certificate Store
PKI Proxy supports selecting certificates installed to either the system certificate store or the current user's certificate store. Navigate to either the System Store or User Store tab and select the desired certificate from the list.
Hardware Tokens / PKCS#11
For hardware tokens, on the Security Key tab first browse to the PKCS#11 driver provided by your hardware token manufacturer. This driver may be installed with tools provided by your hardware token manufacturer or may be provided as a separate download. For instance the "SafeNet Authentication Client" software used by many certificate authorities will install a PKCS#11 library at C:\Windows\System32\eTPKCS11.dll.
Configure Access
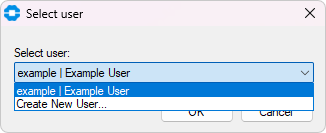
Once you have selected the certificate to be shared and provided an optional alias (e.g., 'Driver signing'), click the Add... button to select users that will have access to the certificate, then click OK to complete the setup.
Configuring startup mode
PKI Proxy has 2 startup settings that you can combine to match your circumstances best. You can set PKI Proxy to "Run as a system service" and/or "Run on system startup". You will find the respective controls at the bottom of the Settings tab of the administration console.
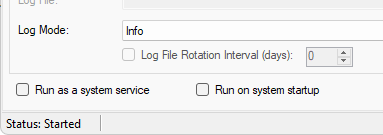
By switching the 'Run as a system service' checkbox you can configure the PKI Proxy sharing server to work as a user-mode background process (the default mode) or a system service. The second option may be useful if you want to run PKI Proxy on an unmanned server.
By default, PKI Proxy registers the service to run under the Local System account. However, if you want to share certificates from a user's Personal system certificate store, you will need to change the service to run under that user's account (from the Windows Services app). A service that runs under the local system or a different account won't be able to see them.
Enabling "Run at system startup" will cause the sharing server and administration console to start automatically when you sign into the system. An entry will be added at "Computer\HKEY_CURRENT_USER\Software\Microsoft\Windows\CurrentVersion\Run" telling Windows to run PKI Proxy at startup, and if "Run as a system service" is also enabled, the service will be set to "Automatic".
Remember to restart the PKI Proxy service after making any changes to the startup mode, including the change of the user account in the Services applet.
Client Configuration (KSP)
General Information
The PKI Proxy Key Storage Provider (KSP) module is a Windows component that enables seamless integration of certificates from a remote PKI Proxy server with the local Windows environment. This provider allows PKI Proxy certificates to appear in the Windows certificate store, enabling third-party applications to access and utilize them as if they were locally stored. Any application that can work with certificates in the local Windows certificate store can transparently use PKI Proxy certificates.
The KSP module is installed during the setup process. After installation the PKIProxyKSP.dll library should be present in both C:\Windows\System32 and C:\Windows\SysWOW64.
Certificates shared by PKI Proxy are not exposed automatically by the KSP. Use the PKIProxyCertMgr.exe application present in the installation directory of PKI Proxy to add, remove, or view remote certificates currently mapped to the Windows certificate store.
Adding a Certificate
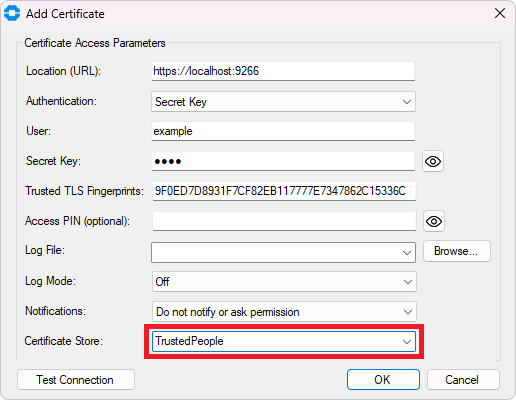
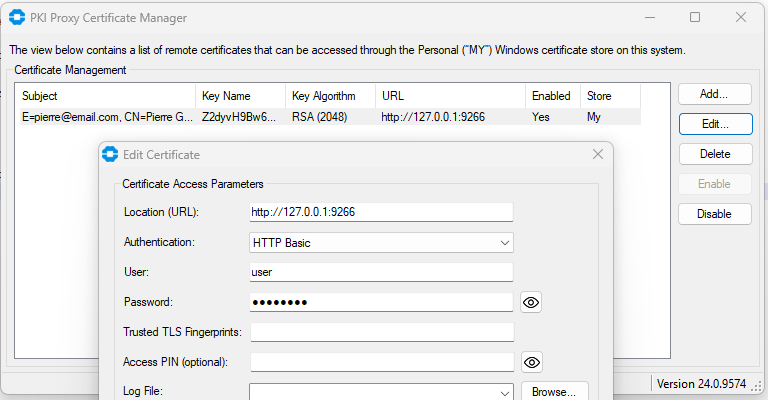
Click the Add button to add a PKI Proxy certificate to the Windows certificate store. The Add Certificate dialog provides options to configure the URL of the PKI Proxy application, as well as user credentials.
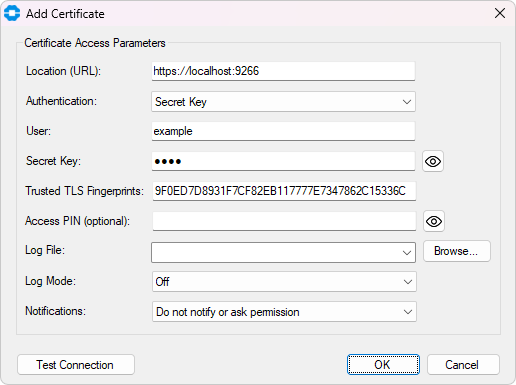
The following configuration options are available in this dialog.
| Server Location | The Location field specifies the URL of the server. If TLS is configured in the PKI Proxy Server, this should begin with "https://" and contain the hostname or IP address of the server, along with the port on which the server is configured to run. For instance https://localhost:9266. |
| User Credentials | The user credentials are specified by setting the Authentication mechanism which matches the user configured in the PKI Proxy Server. When using HTTP NTLM authentication, the current user credentials are automatically used. For Secret Key and HTTP Basic authentication, specify both the user and secret key or password. |
| Server's TLS Identity | The TLS Fingerprints value holds a comma-separated list of one or more TLS fingerprints that identify the PKI Proxy Server. This value is obtained from the PKI Proxy Server Settings tab after configuring the TLS server certificate. For instance 39C57481E978114FE7F164EB4E654B6B87787376. |
| Access PIN (Optional) | The Access PIN is an optional value which further restricts access to the certificate. When specified, any application attempting to use the certificate on the client machine will also need to provide the specified PIN. This is not the PIN of the HSM configured on the server side, this is a user-defined PIN that restricts access on the client side. This setting is optional. |
| Logging and Monitoring | The Log and Notifications settings may be used to monitor client-side operations as they happen. |
| Certificate Store | The Certificate Store specifies which Windows certificate store the certificate will be added to. |
Modifying Certificate Properties
Use the Edit button to update the certificate access properties, such as the access credentials, TLS certificate fingerprint, or logging options.
Removing the Certificate from the Windows Certificate Store
Click the Delete button to remove a PKI Proxy certificate from the Windows store. This does not delete the remote certificate. This operation only removes the certificate from the Windows store.
Disabling a Certificate
Use the Disable button to temporarily disable operations using the configured certificate. The certificate will continue to be visible in the Windows store but cannot be used for any cryptographic operations. Click the Enable button to re-enable the certificate.Client Configuration (PKCS#11)
General Information
The PKI Proxy PKCS#11 driver provides a standardized client-side access mechanism to certificates shared using the PKI Proxy Web API. Any third-party application that knows how to work with PKCS#11 can be used with this driver to perform signing.
PKI Proxy includes four versions of the driver, which are applicable for 32- and 64-bit Windows applications, as well as for 64-bit Linux and macOS programs:
- pkcs11/win32/pkiproxy_pkcs11.dll
- pkcs11/win64/pkiproxy_pkcs11.dll
- pkcs11/linux64/pkiproxy_pkcs11.so
- pkcs11/mac64/pkiproxy_pkcs11.dylib
When referencing the driver, please use the driver version that matches the architecture of your application.
Installing the Driver
Generally, there are no requirements for PKCS#11 drivers to be installed to a specific location, so it can be used from the default installation directory. However, some applications may require that you copy the driver to one of the standard locations (such as C:\Windows\System32) or add the installation directory to the PATH environment variable.
Configuring the Driver
The driver can be configured by creating a configuration file and placing it in the same folder as the DLL, with the file name matching the name of the driver DLL and a '.conf' extension. For instance, pkcs11/win32/pkiproxy_pkcs11.conf.
The following is an example of the contents of the configuration file:
# This file contains settings for the PKI Proxy PKCS#11 driver.
# Please adjust the below parameters to match the actual settings
# of the PKI Proxy sharing application.

[driver]

# Location is the URL where PKI Proxy is running.
#
# Please check that the endpoint is reachable and/or
# allowed through on the firewall if accessing
# the certificate over the Internet.

Location = https://127.0.0.1:9266


# Access credentials: These credentials should match the credentials
# configured in the PKI Proxy server application for the certificate.
#
# The current version supports the following types of access credentials:
# Secret Key, HTTP Basic, and HTTP NTLM. The authentication type
# to use can be specified via the Auth configuration setting.
#
# 1. Secret Key
#
# In this mode you need to provide a pair of credentials via the User
# and SecretKey parameters. These parameters should match those set up
# for the certificate on the server side. For instance:
#
#   Auth = SecretKey
#   User = user
#   SecretKey = SecretAccessKey123
#
# 2. HTTP Basic
#
# This mode expects you to provide the username and password for the HTTP
# Basic authentication mechanism. These should match the credentials
# configured for the certificate in the PKI Proxy application. For instance:
#
#   Auth = Basic
#   User = user
#   Password = password
#
# 3. HTTP NTLM
#
# NTLM authentication lets you authenticate using the Windows-native
# authentication mechanism. Your local credentials are securely mapped
# to the credentials on the remote system. You do not need to provide
# any usernames or passwords for this to work; everything is done
# by Windows behind the scenes.
#
#   Auth = NTLM
#
# NTLM authentication with a user other than the current user is also supported.
# To specify a different user, provide the Username and Password parameters as well.
# For instance
#
#   Auth = NTLM
#   User = OtherUser
#   Password = OtherUserPassword
#
#
# Note: you can encrypt secret values, such as KeySecret, using the pkpenc
# tool from the tools directory.

Auth = SecretKey
User = User
SecretKey = User_Secret_Access_Key


# TrustedTLSCerts should match the fingerprint of the TLS certificate,
# as configured in the PKI Proxy service. For instance:
#
#   TrustedTLSCerts = 68D2E3D6A0FE5FEA72E25AD56706270F9F8B182A

TrustedTLSCerts = TLS_Fingerprint_From_PKI_Proxy


# The optional PIN setting configures the driver to request a PIN
# from any application that uses the PKCS#11 driver. When set, a
# connecting application must specify the PIN that matches the value
# set here. If not set (default), no PIN is required.
#
# Note: this PIN is NOT the PIN that is used on the server side
# to access the HSM (if configured). The PIN provided here is used to restrict
# access to the client-side PKI Proxy PKCS#11 driver. It is exchanged
# only between the connecting application (e.g. Adobe Reader) and the driver.

#PIN = 12345


# LogFile optionally specifies the path to a file on disk.
#
# Use LogMode to specify the required verbosity level. Possible values are:
#  0 - None
#  1 - Error
#  2 - Warning
#  3 - Info (Default)
#  4 - Verbose
#  5 - Debug

#LogFile = C:\temp\pkiproxy.log
#LogMode = 3
Signing Files
General Information
The PKI Proxy PKCS#11 driver is a standard PKCS#11 driver. Configuring a third-party application usually means providing a path to the PKI Proxy PKCS#11 driver DLL that matches the platform the application has been compiled for. Some applications may also require parameters such as the slot number or some form of certificate identifier.
The KSP module lets you add PKI Proxy certificates to the Windows certificate store. This allows third-party Windows applications to use them in a standardized manner. No special setup is needed apart from adding the certificate to the system store using the PKI Proxy Certificate Manager application: the applications that know how to use Windows certificates will pick them up right away.
Signing with Jarsigner
Before following these steps, ensure that PKI Proxy has already been configured to share a certificate and that the local PKI Proxy PKCS#11 driver has been configured to use it. See Client Configuration (PKCS#11) for details about configuring PKI Proxy and the PKCS#11 driver.
Using jarsigner with PKI Proxy is no different than using it with any other PKCS#11 driver. The syntax is as follows:
jarsigner
  -tsa http://timestamp.digicert.com
  -keystore NONE
  -storetype PKCS11
  -providerClass sun.security.pkcs11.SunPKCS11
  -providerArg jarsigner.config
  -storepass fakepass
  -sigalg SHA256withRSA
  MyApp.jar
  "My Certificate"
The -tsa parameter tells jarsigner to use timestamp.digicert.com to timestamp the created signature. A timestamp provides a trusted third-party certification of the signature's creation time.
The -keystore, -storetype, and -providerClass parameters together tell jarsigner to use the PKCS#11 mechanism for signing.
The -providerArg parameter should point to a configuration file that provides the settings for the Sun PKCS#11 provider. Note that it is not the PKI Proxy driver configuration file; it is a separate file that must be created to direct jarsigner to the PKI Proxy PKCS#11 driver. See the following jarsigner.config example (on Windows, note that the paths must use double backslashes, as shown):
name = PKIProxy
library = "C:\\Program Files\\PKI Proxy\\pkcs11\\win64\\pkiproxy_pkcs11.dll"
description = PKI Proxy PKCS#11 driver
slot = 0
The -sigalg parameter specifies the signature algorithm to use
The library setting should point to the 64-bit PKI Proxy PKCS#11 driver. The slot should always be 0 for the current version of PKI Proxy.
MyApp.jar specifies the jar file to sign.
"My Certificate" is the label or alias of the certificate that needs to be used for signing. The exact format of the label and its contents is specific to a particular security device. In some cases, it matches the common name of the certificate subject; in others, it is a general tag such as "Default Signing ID". You can use the keytool utility included with the JRE to find the label of your signing certificate. Use the same configuration parameters that you pass to jarsigner:
keytool
  -list
  -keystore NONE
  -storetype PKCS11
  -providerClass sun.security.pkcs11.SunPKCS11
  -providerArg jarsigner.config
  -storepass fakepass
Provided that the PKI Proxy driver is configured properly and is referenced correctly in jarsigner.config, you should get the following output from the keytool call:
Keystore type: PKCS11
Keystore provider: SunPKCS11-PKIProxy

Your keystore contains 1 entry

Demo Certificate R3 | Demo Certificate R3, PrivateKeyEntry,
Certificate fingerprint (SHA-256): AD:4E:D1:E0:39:C7:94:5E:48:A1:D3:60:17:A0:64:5F:E6:88:B5:E9:84:87:A5:98:25:DE:24:21:83:E9:53:A5
The Demo Certificate R3 | Demo Certificate R3 in the previous output is the label that you need to pass to jarsigner:
jarsigner
  -verbose
  -tsa http://timestamp.digicert.com
  -keystore NONE
  -storetype PKCS11
  -providerClass sun.security.pkcs11.SunPKCS11
  -providerArg jarsigner.config
  -storepass fakepass
  -sigalg SHA256withRSA
  MyApp.jar
  'Demo Certificate R3 | Demo Certificate R3'
Adding the -verbose parameter will make the previous call output the following:
requesting a signature timestamp
TSA location: http://timestamp.digicert.com
 updating: META-INF/MYAPP.SF
 updating: META-INF/MYAPP.RSA
  signing: manifest.mf
  signing: myapp/MyAppFirstClass.class
  signing: myapp/MyAppSecondClass.class
  ...

>>> Signer
    X.509, CN=SecureBlackbox Demo Certificate R3, O="/n software, Inc.", EMAILADDRESS=sales@nsoftware.com, L=Chapel Hill, ST=NC, C=US
    [trusted certificate]
>>> TSA
    X.509, CN=DigiCert Timestamp 2022 - 2, O=DigiCert, C=US
    [certificate is valid from 21/09/2022, 01:00 to 21/11/2033, 23:59]
    X.509, CN=DigiCert Trusted G4 RSA4096 SHA256 TimeStamping CA, O="DigiCert, Inc.", C=US
    [certificate is valid from 23/03/2022, 00:00 to 22/03/2037, 23:59]
    X.509, CN=DigiCert Trusted Root G4, OU=www.digicert.com, O=DigiCert Inc, C=US
    [certificate is valid from 01/08/2022, 01:00 to 09/11/2031, 23:59]

jar signed.
Call jarsigner with the -verify parameter to check the integrity of the created signature, as follows:
jarsigner
  -verify MyApp.jar
  -verbose
The output will be as follows:
s     1341616 Wed Dec 14 13:58:36 GMT 2022 META-INF/MANIFEST.MF
      1340173 Wed Dec 14 14:38:40 GMT 2022 META-INF/MYAPP.SF
        7629 Wed Dec 14 14:38:40 GMT 2022 META-INF/MYAPP.RSA
sm      5690 Thu Dec 01 12:51:34 GMT 2022 manifest.mf
sm      2249 Thu Dec 01 12:51:34 GMT 2022 myapp/MyAppFirstClass.class
...

  s = signature was verified
  m = entry is listed in manifest
  k = at least one certificate was found in keystore

- Signed by "CN=Demo Certificate R3, O="/n software, Inc.", EMAILADDRESS=sales@nsoftware.com, L=Chapel Hill, ST=NC, C=US"
    Digest algorithm: SHA-256
    Signature algorithm: SHA256withRSA, 2048-bit key
  Timestamped by "CN=DigiCert Timestamp 2022 - 2, O=DigiCert, C=US" on Wed Dec 14 14:38:48 UTC 2022
    Timestamp digest algorithm: SHA-256
    Timestamp signature algorithm: SHA256withRSA, 4096-bit key

jar verified.
Signing with SignTool
Microsoft uses a proprietary Authenticode format for signing executable files. PKI Proxy supports the following methods for creating Authenticode signatures.
- Using Microsoft SignTool with the PKI Proxy KSP
- Using pkpsigntool as a drop-in replacement for Microsoft SignTool
- Using Microsoft SignTool with PKCS#11 (not recommended)
Using Microsoft SignTool (KSP)
Before following these steps, ensure that PKI Proxy has already been configured to share a certificate and that the certificate has been imported to the Windows certificate store using the Certificate Manager application. See Client Configuration (KSP) for details about configuring PKI Proxy and the Windows KSP module.
The easiest way to use signtool with PKI Proxy is by leveraging the PKI Proxy KSP module. In this case the use of signtool is no different to the way you would use it normally. The PKI Proxy client and server components will do their magic transparently and securely behind the scenes.
To sign an executable with a PKI Proxy certificate, use the following syntax:
signtool sign /fd SHA256 /sha1 2170a80c36fcafe9b0a2f5ce150ccdd496c7203d program.exe
In the command above, the 2170a80c36fcafe9b0a2f5ce150ccdd496c7203d string is the SHA1 fingerprint of the certificate to use. You can check it by opening the certificate from the Windows certificates MMC applet and consulting the Thumbprint property:
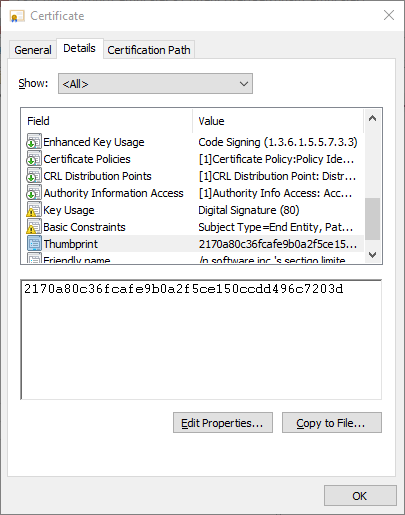
If the PKI Proxy sides have been configured correctly, and the service is online, signtool should output the result of the signing operation:
Done Adding Additional Store
Successfully signed: program.exe
Using pkpsigntool
Before following these steps, ensure that PKI Proxy has already been configured to share a certificate and that the local PKI Proxy PKCS#11 driver has been configured to use it. See Client Configuration (PKCS#11) for details about configuring PKI Proxy and the PKCS#11 driver. For ease of use, PKI Proxy includes a utility called pkpsigntool, which is capable of creating Authenticode signatures and also includes support for PKCS#11 drivers. The Microsoft SignTool utility does not include direct support for PKCS#11 drivers.
Use the following syntax with the included pkpsigntool utility to sign an executable with a certificate shared by PKI Proxy:
pkpsigntool
  sign
  /d "PKI Proxy Signature"
  /fd sha256
  /f "C:\Program Files\PKI Proxy\pkcs11\win64\pkiproxy_pkcs11.dll"
  /tr http://timestamp.server.com
  /td sha256
  /ac ca.pem
  /ac root.pem
  App.exe
The /d parameter specifies the short description string that is embedded into the signature.
The optional /du parameter may be used to provide a link to a web page providing a longer description.
The /fd parameter specifies the digest algorithm to use for signing. For instance sha256.
The /f parameter provides a path to the PKCS#11 driver to use for signing. Specify the path to the 64-bit PKI Proxy PKCS#11 driver here.
The /tr parameter specifies the timestamp server to use when timestamping the created signature. A timestamp provides a trusted third-party certification of the signature creation time. Authenticode supports two forms of timestamps. Use the /t flag to specify a so-called 'legacy' timestamping service, or /tr to specify an RFC 3161-compatible timestamping service. Because most modern environments use RFC 3161-compatible services, it is safe to assume the use of the /tr flag.
The /td parameter specifies the digest algorithm to use for timestamping (e.g., sha256).
The /ac parameter allows passing any additional certificates that may make sense in the signature. Typically, this flag is used to pass the certificates that make up the signing certificate chain.
The /n parameter allows selecting a certificate by its name. This is useful when multiple certificates are available. This may be set to the alias value as defined in PKI Proxy, or the common name of the certificate. For instance, if the subject includes CN=My Certificate, this may be set to the value My Certificate. This parameter is optional.
The /i parameter allows selecting a certificate by its issuer's name. This is useful when multiple certificates are available. This may be set to the common name of the certificate's issuer. For instance, if the issuer certificate's subject includes CN=DigiCert EV Code Signing CA, this may be set to the value DigiCert EV Code Signing CA. This parameter is optional.
The /sha1 parameter allows selecting a certificate by its SHA-1 hash value (as a hex-encoded string). This is useful when multiple certificates are available. This is commonly referred to as the thumbprint when viewing the certificate details within Windows, such as d81a01d4f47797faab50400e85817dc974f4b3f3. This parameter is optional.
The /u parameter optionally specifies the Enhanced Key Usage (EKU) OID that must be present in the signing certificate. The value must be an OID. For instance, the code-signing key usage OID is 1.3.6.1.5.5.7.3.3. This parameter is optional.
The /p parameter specifies a PIN, if required. If the driver is configured to require a PIN from connecting applications, the PIN can be specified by setting this parameter (e.g., /p 12345).
Provided that the PKI Proxy driver is configured properly, you should get the following output from the above pkpsigntool call:
Opening PKCS#11 storage...
Storage opened, looking for a nonempty slot...
Token found in slot #0 (AKS ifdh 0)
Logged in, looking for the certificate
Requesting an RFC 3161 timestamp from http://timestamp.server.com
Timestamp received and embedded into the signature
SUCCESS: App.exe
All files have been processed successfully
You can verify that the signature was added successfully by right-clicking on the signed executable in Windows Explorer, selecting Properties from the pop-up menu, and checking the Digital Signatures tab on the dialog that appears.
Using Microsoft SignTool (PKCS#11)
Before following these steps, ensure that PKI Proxy has already been configured to share a certificate and that the local PKI Proxy PKCS#11 driver has been configured to use it. See Client Configuration (PKCS#11) for details about configuring PKI Proxy and the PKCS#11 driver.
It is recommended to use Microsoft SignTool with the PKI Proxy KSP, or use the included pkpsigntool utility to simplify the authenticode signing process whenever possible. The following steps using the Microsoft SignTool utility should be used only if there is a specific reason to do so. Please see the Signing with SignTool section for details on using pkpsigntool.
The Microsoft SignTool utility does not include direct support for PKCS#11 drivers. While signtool can be used with PKCS#11 drivers such as PKI Proxy, it requires several additional steps and requires the use of a separate PKCS#11 tool that is not part of PKI Proxy.
If pkpsigntool cannot be used and SignTool must be used, the first step is to generate the digest with signtool by using the /dg option. In the following example, the nsoftware.cer file is the public x509 certificate. The private key of the code signing certificate must correspond to this public certificate.
signtool.exe sign /dg c:\temp\sign /fd SHA256 /f c:\temp\sign\nsoftware.cer c:\temp\sign\test.exe
The output of the above command is a Base64-encoded digest. The digest must be formatted properly to be used. The value must first be Base64 decoded. For instance, using the Base64 utility from Cygwin:
Base64 -d c:\temp\sign\test.exe.dig > c:\temp\sign\test.exe.dig.bin
Next the decoded SHA-256 digest must be modified to include a prefix to indicate the hash algorithm that was used to calculate it. The prefixes are defined by PKCS#11. One way to accomplish this is to first prepare a "prefix" file that then can be concatenated with the digest file from the above command. To do this, create a file with the hex contents 3031300d060960864801650304020105000420.
NOTE: The file contents must be the bytes corresponding to the hex characters. Copying the hex string into a file will not result in the correct contents.
Once the SHA-256 prefix file has been created, it can be concatenated with the digest. For instance, using the cat cat command from Cygwin.
cat c:\temp\sign\sha256prefix.bin c:\temp\sign\test.exe.dig.bin > c:\temp\sign\test.exe.fmtdig.bin
The digest should now be properly prepared; however, a separate tool must be used to perform the signing. PKCS#11 tools may be obtained from the device manufacturer, or other tools like pkcs11-tool from OpenSC may be used. The PKCS#11 tool you choose must first be configured to use the PKI Proxy PKCS#11 driver. Consult the documentation for your tool provider for instructions on how to configure a PKCS#11 module (.dll).
Once the pkcs11 tool has been configured, it can be used to sign the digest. As an example, when using pkcs-tool from OpenSC the --list-objects operation may be used to determine the Id of the certificate that will be used. For instance:
pkcs11-tool --list-objects
Using slot 0 with a present token (0x0)
Public Key Object; RSA 2048 bits
  label:      SIGN pubkey
  ID:         02
  Usage:      encrypt, verify, wrap
  Access:     none
Certificate Object; type = X.509 cert
  label:      Certificate for Digital Signature
  subject:    DN: C=US/postalCode=27517, ST=NC, L=Chapel Hill/street=101 europa dr ste 110, O=/N SOFTWARE INC., CN=/N SOFTWARE INC.
  ID:         02
In this case, the Id is 02.
To then sign the digest with pkcs11-tool, the following command can be used. The RSA-PKCS mechanism should be used, not the SHA256-RSA-PKCS mechanism. The latter will also attempt to calculate a hash, which has been done in previous steps using the /dg option.
pkcs11-tool --sign --id 02 -l --pin 123456 --mechanism RSA-PKCS -i c:\temp\sign\test.exe.fmtdig.bin -o c:\temp\sign\test.exe.dig.bin.signed
Using slot 0 with a present token (0x0)
Using signature algorithm RSA-PKCS
The output of the previous command is a binary file and must be Base64 encoded for signtool to use it. The Base64 tool from Cygwin can be used to accomplish this. For instance:
Base64 c:\temp\sign\test.exe.dig.bin.signed > c:\temp\sign\test.exe.dig.signed
To import the signed digest and complete the signing process with signtool the following command may be used:
signtool.exe sign /di "C:\temp\sign" C:\temp\sign\test.exe
If successful, an output message such as Successfully signed: C:\temp\sign\test.exe should be visible.
If timestamping is desired, the /tr option of the signtool utility may be used.
Signing with OVF Tool
Before following these steps, ensure that PKI Proxy has already been configured to share a certificate and that the local PKI Proxy PKCS#11 driver has been configured to use it. See Client Configuration (PKCS#11) for details about configuring PKI Proxy and the PKCS#11 driver.
VMware OVF Tool can be used with PKI Proxy to sign OVF or OVA packages. The utility includes a --signCommand option that allows you to delegate the low-level signing operation to a custom callback instead of signing directly with a local PEM file. Within this user-defined callback, pkptool can be leveraged to sign the manifest (.mf) file and help construct the required signature (.cert) file.
First, the .mf file is generated automatically by OVF Tool and contains a SHA-256 hash of each file in the input OVF or OVA package (e.g., the .ovf file and, if applicable, the .vmdk file). For example:
SHA256(test-signed.ovf)= c8df9fdec1a5069b1cacda878f9fb91bb1294fae8ab2c7f0c668e4d8a2c9083f
SHA256(test-signed-disk1.vmdk)= 9ec172ae4b2414535b5abdcddfeb68281158a6c9b8eacf1d075d4d90ab34e236
The script passed to --signCommand must then accept the path to this .mf file as input and produce a .cert file in the following format:
SHA256(test-signed.mf)= 626920...b8f51b
-----BEGIN CERTIFICATE-----
MIIEaDCCA1CgAwIBAgIFYA3A3gMwDQYJKoZIhvcNAQELBQAwgZ0xCzAJBgNVBAYT
...
T3ZOjTRxt3DJqbWRSqutKFsyFAdtwfuAbsI6hg==
-----END CERTIFICATE-----
This file contains a signed SHA-256 hash of the provided .mf file concatenated with the public part of the signing certificate.
A sample Windows batch script, sign.cmd, that implements these steps is given below. pkptool calculates the hash of the .mf file, signs that hash with the private key, and separately exports the public certificate from PKI Proxy.
@echo off

set url=http://127.0.0.1:9266
set user=user
set password=password
set pin=123456

echo Generating the name of the target file (same name as input but with .cert extension)
set input_file=%1
set output_file=%input_file:.mf=.cert%
set input_file_no_path=%~nx1
set tmp_file_sig_bin=%input_file%.sbin
set tmp_file_sig_hex=%input_file%.shex
set cert_file=cert-pub.pem

echo Calling pkptool to sign the file: the result is returned as a binary PKCS#1 signature
"C:\Program Files\PKI Proxy 2024\tools\pkptool.exe" sign -l %url% -u %user% -p %password% -pin %pin% -in %input_file% -hash SHA256 -out %tmp_file_sig_bin%

echo Encoding the signature into base16 - the format that is used in the .cert file
certutil -encodehex %tmp_file_sig_bin% %tmp_file_sig_hex% 0x4000000C

echo Composing the output file out of the signature and certificate
echo | set /p prefix="SHA256(%input_file_no_path%)= " >%output_file%
type "%tmp_file_sig_hex%" >>%output_file%
echo.>>%output_file%
"C:\Program Files\PKI Proxy 2024\tools\pkptool.exe" export -l %url% -u %user% -p %password% -pin %pin% -out %cert_file% -type certificate
type %cert_file% >> %output_file%
Finally, use the following command to pass the script to OVF Tool and perform the signing:
ovftool.exe --signCommand=sign.cmd test.ovf test-signed.ovf
Note that the callback that you pass to --signCommand does not necessarily need to be a batch file. You can use any callable file format supported by the platform (.exe, ELF, or Mach-O programs, as well as Powershell or Bash scripts), as long as this callback accepts a path to the manifest file as its first parameter and produces the signature file in the format described above.
The described "signing callback" approach is not unique for OVF Tool, and can be used similarly with any other signing application that supports hash-to-signature callbacks.
Signing with Adobe
PKI Proxy can be used to sign PDFs from Adobe Acrobat or Reader. Please use the following steps to make the remote certificate available for signing in Adobe Acrobat or Reader.
Using the KSP module with Adobe
The easiest way to use PKI Proxy to sign documents in Adobe is by leveraging the PKI Proxy KSP module. You do not need to perform any extra steps for KSP-based signing with Adobe, as long as PKI Proxy has been configured to share a certificate and the certificate has been imported to the Windows certificate store using the Certificate Manager application.
See Client Configuration (KSP) for details about configuring PKI Proxy and the Windows KSP module.
Using the PKCS#11 driver with Adobe
Before following these steps, ensure that PKI Proxy has already been configured to share a certificate and that the local PKI Proxy PKCS#11 driver has been configured to use it. See Client Configuration (PKCS#11) for details about configuring PKI Proxy and the PKCS#11 driver.
Adobe products can use third-party PKCS#11 drivers only when working in nonprotected mode. To start the Adobe application in nonprotected mode, navigate to Edit -> Preferences -> Security (Enhanced), and uncheck the Enable Protected Mode at startup box at the top, and then restart the application.
After restarting the Adobe application, navigate to Edit -> Preferences -> Signatures, and click the More... button opposite the "Identities and Trusted Certificates" section. In the dialog that appears, click on the PKCS#11 Modules and Tokens item in the tree on the left, and click on the Attach Module button at the top. Navigate to the PKI Proxy driver location (normally C:\Program Files\PKI Proxy\pkcs11\win32). Make sure to select the win32 version of the driver to match the architecture of the Acrobat executable.
After selecting PKI Proxy's win32 PKCS#11 driver, the virtual device should be added to the list under the PKCS#11 Modules and Tokens branch. The titles of the elements may differ and depend on the type of the certificate being shared. For instance:
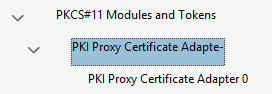
Click on the middle entry (PKI Proxy Certificate Adapter- in the previous example), and then on the Login button at the top. If the driver configuration file (pkiproxy_pkcs11.conf) enables PIN protection for the driver, please provide the PIN when asked. If PIN protection is not enabled any value may be used. Your certificate is protected by the real credentials that you specify in the driver configuration file.
Next select the last entry in the list (PKI Proxy Certificate Adapter 0 in our example), after which you should see the certificate in the panel on the right. Click on the certificate entry, and then click the Usage Options button at the top and check the Use for Signing item (make sure a check appears next to the item).
Close all currently open dialogs to complete the setup process. Documents can now be signed.
PDF Signing
After the setup above, the signing process is the same regardless of whether you are using the KSP or the PKCS#11 driver. To sign a PDF document, open the document and navigate to the signing facility of your PDF application. In Adobe Reader, you can access this functionality by clicking the More Tools button on the panel on the right (at the very bottom), and then selecting the Certificates applet in the list. Doing so adds a Certificates panel at the top of the document view.
On the Certificates panel, click on the Digitally Sign button:

Draw the signature square with your mouse when asked. Select the shared certificate in the list that appears. It should have the PKCS#11 device (for certificates accessed via the driver) or Windows Digital ID (for certificates accessed via the KSP module) marker in brackets to the right of its subject string. Click Continue.
Click Sign. When asked, specify the location where to save the signed document.
Signing with JavaScript (In Browser)
Before following these steps, ensure that PKI Proxy has already been configured to share a certificate and that the local PKI Proxy PKCS#11 driver has been configured to use it. See Client Configuration (PKCS#11) for details about configuring PKI Proxy and the PKCS#11 driver.
PKI Proxy includes a Javascript module that can be used to access the Web API from Javascript code running within a web page. The module provides a collection of easy-to-use classes that encapsulate certificate browsing and signing functionality.
The Javascript module sends data to PKI Proxy for signing and returns the signature. PKI Proxy may run either locally on 127.0.0.1 or elsewhere on the Internet.
The following code snippet shows how to sign data in the browser with PKI Proxy:
  // Provide user credentials
  keystore.setUserId(userId);
  keystore.setUserKeySecret(userSecret);

  // Open the shared key store
  await keystore.open('https://sharedkeys.mycompany.com/', 'open', '');

  // Select the signing key
  await keystore.select('id=' + keyid, true, false, 0);

  // Prepare the input
  var buf = (new TextEncoder()).encode('Hello, world!');

  // Specify the signing key
  crypto.setCryptoKey(keystore.getKeys().item(0));

  // Specify the security mechanism to use
  crypto.setMechanism('sha256WithRSAEncryption');

  // Sign the data.
  var res = await crypto.sign(buf, true);
This snippet matches the following OpenSSL command, which uses a local private key:
$> openssl dgst -sign privkey.pem -keyform PEM -sha256 -out signature.bin data.txtThe signature produced by this code snippet can then be validated with the inverse OpenSSL command:
$> openssl dgst -verify pubkey.pem -keyform PEM -sha256 -signature signature.bin -binary data.txt
Please refer to the Javascript demo application in the demos\js directory of the installation for more information.
Signing with SecureBlackbox
Before following these steps, ensure that PKI Proxy has already been configured to share a certificate and that the local PKI Proxy PKCS#11 driver has been configured to use it. See Client Configuration (PKCS#11) for details about configuring PKI Proxy and the PKCS#11 driver.
SecureBlackbox can use the PKI Proxy PKCS#11 driver to access remote certificates as if they were local. Just provide the path to the configured PKI Proxy driver where you would normally provide a path to a regular PKCS#11 driver.
The following code snippet illustrates the use of the PKI Proxy driver with SecureBlackbox:
  Certificatestorage storage = new Certificatestorage();

  // Opening the storage
  storage.Open("pkcs11://user:password@localhost/C:/Program%20Files/PKI%20Proxy/pkcs11/win32/pkiproxy_pkcs11.dll?readonly=true");

  // Listing the certificates
  Certificate cert = null;
  for (int i = 0; i < storage.Certificates.Count; i++)
  {
      Console.WriteLine("Certificate " + (i + 1).ToString() + ": " + storage.Certificates[i].SubjectRDN);

      // Using the first certificate with a private key to do the signing
      if ((cert == null) && (storage.Certificates[i].PrivateKeyExists))
      {
          cert = storage.Certificates[i];
          Console.WriteLine("(using the above certificate for signing)");
      }
  }

  // Signing an XML document
  if (cert != null)
  {
      Xadessigner signer = new Xadessigner();

      signer.SigningCertificate = cert;
      signer.InputFile = "unsigned.xml";
      signer.OutputFile = "signed.xml";
      signer.IgnoreChainValidationErrors = true;
      signer.Sign();

      Console.WriteLine("Signing succeeded\r\n");

      signer.Dispose();
  }
  else
  {
      Console.WriteLine("No suitable signing certificates found");
  }

  // Closing the storage
  storage.Close(false);
  storage.Dispose();
Advanced
PKI Proxy can be accessed by any tool or library that supports PKCS#11 operations. The included PKI Proxy PKCS#11 driver can be used like any other PKCS#11 driver.
The PKI Proxy PKCS#11 driver communicates with a REST API to discover certificates and make signing requests. In addition, the REST API can be used directly to perform common operations, such as signing without the need for PKCS#11 support. For details on on the API, go to REST API
Scripting and Automation
PKI Proxy includes a pkptool utility that provides a console interface to client-side PKI Proxy functions. You can use this tool to make PKI Proxy calls from scripts and non-interactive applications. The tool can also be useful in investigating PKI Proxy connectivity issues and managing its configuration files.
The pkptool utility is available for Windows, Linux, and macOS, and it can be found in the "tools" folder in the installation directory. It provides the following functions:
- Obtaining PKI Proxy web service information
- Listing and exporting public objects from a live PKI Proxy web service
- Making signing, encryption, and decryption requests to the service
- Managing certificates available via the KSP module
- Editing configuration files for the PKI Proxy PKCS#11 driver
You can access the usage information for a particular command by calling it with the -help parameter:
pkptool sign -help
General
This is the help output for "pkptool -help". It lists the available commands and general-use options.
Usage: pkptool [command] [options]

Commands:

  info               Get PKI Proxy service information
  config             Show, create, or change configuration file
  list               Lists objects in a PKI Proxy key store
  export             Export certificate or public key
  sign               Sign a file or text
  encrypt            Encrypt a file or text
  decrypt            Decrypt a file or text
  req                Generate a CSR over a keypair
  enc                Encrypt or decrypt a sensitive string using system encryption (DPAPI)
  ksp                Performs Windows KSP operations

Common options:

  -verbose|-v        Verbose output when executing the command
  -help              Show help information

PKI Proxy service options:

  -config|-c         Path to the configuration file
  -location|-l       Service location/URL
  -authtype|-a       Authentication type. Possible values are: SecretKey, Basic, NTLM
  -user|-u           Username for authentication
  -secretkey|-s      SecretKey value for SecretKey authentication type
  -password|-p       Password for Basic and NTLM authentication types
  -trustedtlscerts   Fingerprint(s) of trusted TLS certificates
  -logfile|-lf       Path to the log file
  -logmode|-lm       The required log verbosity level. Possible values are:
      0 - None
      1 - Error
      2 - Warning
      3 - Info (Default)
      4 - Verbose
      5 - Debug
  -pin               PKCS11 driver access PIN
  -notifications|-n  Tray notifications setting: 0 - None, 1 - Confirm, 2 - Notify

Use "pkptool command_name -help" for usage of command_name
Config
The "config" command can be used to edit a config file for the PKI Proxy PKCS#11 driver.Usage: pkptool config [options]
Common options:
-verbose|-v Verbose output when executing the command
-help Show help information
Config command options:
-new Create new configuration file
-input|-in Path to configuration file to show/change
-output|-out Path to new configuration file
-print Print the contents of the configuration file in user-friendly form
-location|-l New PKI Proxy service location
-authtype|-a New authentication type. Possible values are: SecretKey, Basic, NTLM
-user|-u New username for authentication
-secretkey|-s New secret key value for SecretKey authentication type
-password|-p New password for Basic and NTLM authentication types
-trustedtlscerts New fingerprints of trusted TLS certificates
-logfile|-lf New path to the log file
-logmode|-lm New log mode. Possible values are:
0 - None
1 - Error
2 - Warning
3 - Info (Default)
4 - Verbose
5 - Debug
-pin New PKCS11 driver access PIN
-notifications|-n New tray notification level: 0 - None, 1 - Confirm, 2 - Notify
Decrypt
The "decrypt" command can be used to decrypt an encrypted file.Usage: pkptool decrypt [options]
Common options:
-verbose|-v Verbose output when executing the command
-help Show help information
PKI Proxy service options:
-config|-c Path to the configuration file
-location|-l Service location/URL
-authtype|-a Authentication type. Possible values are: SecretKey, Basic, NTLM
-user|-u Username for authentication
-secretkey|-s SecretKey value for SecretKey authentication type
-password|-p Password for Basic and NTLM authentication types
-trustedtlscerts Fingerprint(s) of trusted TLS certificates
-logfile|-lf Path to the log file
-logmode|-lm The required log verbosity level. Possible values are:
0 - None
1 - Error
2 - Warning
3 - Info (Default)
4 - Verbose
5 - Debug
-pin PKCS11 driver access PIN
-notifications|-n Tray notifications setting: 0 - None, 1 - Confirm, 2 - Notify
Decrypt command options:
-id The id of the private key to use
-label The label of the private key to use
-handle The handle of the private key to use
-k The KSP key identifier
-input|-in Path to file to be decrypted.
-output|-out Where to save the decrypted file
Enc
The "enc" command can be used to encrypt or decrypt input with the system's encryption API
Usage: pkptool enc [options]

Common options:

  -verbose|-v        Verbose output when executing the command
  -help              Show help information

Encrypt command options:

  -encrypt|-e        Encrypt the input
  -decrypt|-d        Decrypt the input
  -input|-in         Path to file to be encrypted.
  -output|-out       Where to save the encrypted file
  -nonotify          Use non-interactive encryption
  -quiet             Print only encrypted/decrypted data
Encrypt
The "encrypt" command can be used to encrypt a file.Usage: pkptool encrypt [options]
Common options:
-verbose|-v Verbose output when executing the command
-help Show help information
PKI Proxy service options:
-config|-c Path to the configuration file
-location|-l Service location/URL
-authtype|-a Authentication type. Possible values are: SecretKey, Basic, NTLM
-user|-u Username for authentication
-secretkey|-s SecretKey value for SecretKey authentication type
-password|-p Password for Basic and NTLM authentication types
-trustedtlscerts Fingerprint(s) of trusted TLS certificates
-logfile|-lf Path to the log file
-logmode|-lm The required log verbosity level. Possible values are:
0 - None
1 - Error
2 - Warning
3 - Info (Default)
4 - Verbose
5 - Debug
-pin PKCS11 driver access PIN
-notifications|-n Tray notifications setting: 0 - None, 1 - Confirm, 2 - Notify
Encrypt command options:
-id The id of the public key to use
-label The label of the public key to use
-handle The handle of the public key to use
-k The KSP key identifier
-input|-in Path to file to be encrypted.
-output|-out Where to save the encrypted file
Export
The "export" command can be used to export a public certificate or key from PKI Proxy.Usage: pkptool export [options]
Common options:
-verbose|-v Verbose output when executing the command
-help Show help information
PKI Proxy service options:
-config|-c Path to the configuration file
-location|-l Service location/URL
-authtype|-a Authentication type. Possible values are: SecretKey, Basic, NTLM
-user|-u Username for authentication
-secretkey|-s SecretKey value for SecretKey authentication type
-password|-p Password for Basic and NTLM authentication types
-trustedtlscerts Fingerprint(s) of trusted TLS certificates
-logfile|-lf Path to the log file
-logmode|-lm The required log verbosity level. Possible values are:
0 - None
1 - Error
2 - Warning
3 - Info (Default)
4 - Verbose
5 - Debug
-pin PKCS11 driver access PIN
-notifications|-n Tray notifications setting: 0 - None, 1 - Confirm, 2 - Notify
Export command options:
-id Extract object by id
-label Extract object by label
-handle Extract object by handle
-output|-out Where to save the object
-type Extract object(s) by type: publickey, certificate
-exportpassword|-ep Password to file with extraction object
Info
The "info" command can be used to return information on the PKI Proxy service.Usage: pkptool info [options]
Common options:
-verbose|-v Verbose output when executing the command
-help Show help information
PKI Proxy service options:
-config|-c Path to the configuration file
-location|-l Service location/URL
-authtype|-a Authentication type. Possible values are: SecretKey, Basic, NTLM
-user|-u Username for authentication
-secretkey|-s SecretKey value for SecretKey authentication type
-password|-p Password for Basic and NTLM authentication types
-trustedtlscerts Fingerprint(s) of trusted TLS certificates
-logfile|-lf Path to the log file
-logmode|-lm The required log verbosity level. Possible values are:
0 - None
1 - Error
2 - Warning
3 - Info (Default)
4 - Verbose
5 - Debug
-pin PKCS11 driver access PIN
-notifications|-n Tray notifications setting: 0 - None, 1 - Confirm, 2 - Notify
KSP
The "ksp" command can be used to configure the PKI Proxy KSP from the command line.Usage: pkptool ksp [options]
Common options:
-verbose|-v Verbose output when executing the command
-help Show help information
KSP command options:
-o The KSP operation. Possible values are:
install - Register a PKI Proxy KSP in the system
uninstall - Unregister a PKI Proxy KSP from the system
enumprovs - Return a list of KSPs registered on the system
import - Install a PKI Proxy certificate to the system MY store
remove - Remove a PKI Proxy certificate from the system MY store
list - Return a list of PKI Proxy certificates installed in the system's MY store
update - Update an installed certificate's configuration record
export - Export an installed certificate's configuration record
enable - Enable an installed PKI Proxy certificate
disable - Disable an installed PKI Proxy certificate
List
The "list" command can be used to list the certificates available from the PKI Proxy web APIUsage: pkptool list [options]
Common options:
-verbose|-v Verbose output when executing the command
-help Show help information
PKI Proxy service options:
-config|-c Path to the configuration file
-location|-l Service location/URL
-authtype|-a Authentication type. Possible values are: SecretKey, Basic, NTLM
-user|-u Username for authentication
-secretkey|-s SecretKey value for SecretKey authentication type
-password|-p Password for Basic and NTLM authentication types
-trustedtlscerts Fingerprint(s) of trusted TLS certificates
-logfile|-lf Path to the log file
-logmode|-lm The required log verbosity level. Possible values are:
0 - None
1 - Error
2 - Warning
3 - Info (Default)
4 - Verbose
5 - Debug
-pin PKCS11 driver access PIN
-notifications|-n Tray notifications setting: 0 - None, 1 - Confirm, 2 - Notify
List command options:
-format|-f List format: raw, default, group
Sign
The "sign" command can be used to sign a file.Usage: pkptool sign [options]
Common options:
-verbose|-v Verbose output when executing the command
-help Show help information
PKI Proxy service options:
-config|-c Path to the configuration file
-location|-l Service location/URL
-authtype|-a Authentication type. Possible values are: SecretKey, Basic, NTLM
-user|-u Username for authentication
-secretkey|-s SecretKey value for SecretKey authentication type
-password|-p Password for Basic and NTLM authentication types
-trustedtlscerts Fingerprint(s) of trusted TLS certificates
-logfile|-lf Path to the log file
-logmode|-lm The required log verbosity level. Possible values are:
0 - None
1 - Error
2 - Warning
3 - Info (Default)
4 - Verbose
5 - Debug
-pin PKCS11 driver access PIN
-notifications|-n Tray notifications setting: 0 - None, 1 - Confirm, 2 - Notify
Sign command options:
-id The id of the private key to use
-label The label of the private key to use
-handle The handle of the private key to use
-k The KSP key identifier
-input|-in Path to file to be signed.
-output|-out Where to save the signed file
-hashed Indicates that input file contains the hash to be signed (no need to hash it)
-hash|-d The hash algorithm to use
Req
The "req" command can be used to generate certificate signing requests (CSRs) over a shared keypair.Usage: pkptool req [options]
Common options:
-verbose|-v Verbose output when executing the command
-help Show help information
PKI Proxy service options:
-config|-c Path to the configuration file
-location|-l Service location/URL
-authtype|-a Authentication type. Possible values are: SecretKey, Basic, NTLM
-user|-u Username for authentication
-secretkey|-s SecretKey value for SecretKey authentication type
-password|-p Password for Basic and NTLM authentication types
-trustedtlscerts Fingerprint(s) of trusted TLS certificates
-logfile|-lf Path to the log file
-logmode|-lm The required log verbosity level. Possible values are:
0 - None
1 - Error
2 - Warning
3 - Info (Default)
4 - Verbose
5 - Debug
-pin PKCS11 driver access PIN
-notifications|-n Tray notifications setting: 0 - None, 1 - Confirm, 2 - Notify
Req command options:
-id The id of the private key to use
-label The label of the private key to use
-handle The handle of the private key to use
-k The KSP key identifier
-hash|-d The hash algorithm to use
-input|-in The OpenSSL-compliant CSR definitions file.
-output|-out Where to save the CSR
-outform Output format (DER or PEM)
The req command expects The CSR declarations file to be provided via the -input|-in parameter. The format of the declarations file is compatible with the format used by OpenSSL for the same purpose. Below is an example of such declarations file.
[ req ]
distinguished_name	= req_distinguished_name

req_extensions = v3_req

[ req_distinguished_name ]
countryName			= FR

stateOrProvinceName		= Bretagne

localityName			= Rennes

organizationName		= Pierre Papier et Ciseaux Sarl

organizationalUnitName		= Bureau

commonName			= Pierre Grosse

emailAddress			= pierre@email.com

[ v3_req ]

# Extensions to add to a certificate request

basicConstraints = CA:FALSE
keyUsage = nonRepudiation, digitalSignature, keyEncipherment
See Using CSRs for setting up trusted certificate flows for details about setting up the CSR-based certificate generation flow in PKI Proxy.
Using Other Certificate Stores
Choosing a Certificate Store
When adding a new key, the PKI Proxy Certificate Manager selects the Personal (MY) certificate store by default. However, some key providers such as Safenet Authentication Client also automatically deploy keys to the Personal certificate store, which can cause conflicts. You can avoid such conflicts by selecting a different certificate store when adding a certificate to the PKI Proxy KSP.
You can select which certificate store to add a certificate to by setting the Certificate Store field while adding a certificate. For example, you could set it to "Trusted People" instead of the default "My":
You would then select the certificate from that store using the normal method for your application. For example, to choose the certificate store that Microsoft SignTool will use, set the "/s" parameter to the name of the store:
signtool sign /fd sha256 /n "PKI Proxy Signing Cert" /s TrustedPeople /v /debug installer.exe
Custom Certificate Stores
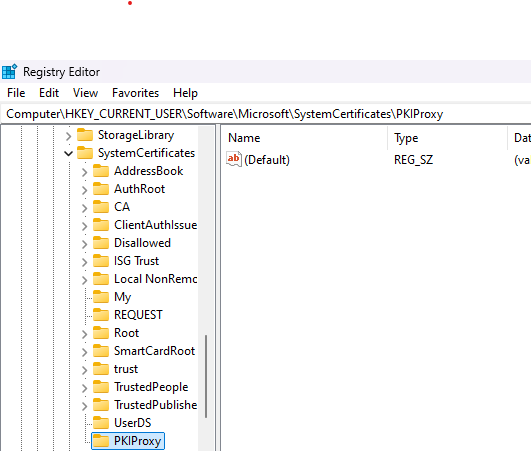
You can also create a custom certificate store to keep your PKI Proxy certificates in their own category. To do that, go to one of the following locations in the registry, right-click the SystemCertificates key, and add a new key with the name of the store you want to create:
For Machine-wide certificate stores: HKEY_LOCAL_MACHINE\SOFTWARE\Microsoft\SystemCertificates
For User-specific certificate stores: HKEY_CURRENT_USER\SOFTWARE\Microsoft\SystemCertificates
Once you've added that key, you should be able to pick the new custom certificate store when adding a certificate in the PKIProxy Certificate Manager. However, please note that not all applications support custom certificate stores. For example, you can use SignTool with the same command as above by simply replacing "TrustedPeople" with the custom certificate store's name, but the NuGet CLI only supports the default Windows Certificate stores.
Using CSRs for setting up trusted certificate flows
Using CSRs for setting up trusted certificate flows
Certificate signing requests (CSRs), sometimes also called PKCS#10 requests or simply certificate requests, is a standardized mechanism for secure and/or automated provisioning of trusted signing certificates. It is used by most of public Certification Authorities for providing security-critical signing and authentication certificates to users without accessing their private keys.
Unlike the PFX route, where the CA generates the whole keypair and just sends it to the user, the CSR route is based on the user generating the keypair on their local system and then requesting the CA to sign its public key with a trust anchor. The private key never leaves the user's premises, staying secure on their system or in their Cloud vault.
The CSR-based certificate issuance process consists of the following three steps:
1. Generating a keypair
On the first step, the user generates a keypair and signs the new public key with the new private key. The resulting signed document is called a certificate request (CSR). Besides the private key, the CSR contains the Distinguished Name that the user wants to be recorded in the future certificate and some additional details, such as what purposes the user wants the certificate to carry.
2. Sending the CSR to the CA
The user sends the created CSR to the CA of his choice. The CA processes the CSR and conducts appropriate identity checks to make sure the user is who they claim to be. This process differs between CAs. Some will check identity against online records or credit rating companies, others will make a phone call on the official telephone number. Having verified the identity, the CA signs the public key and the Distinguished Name contained in the CSR, thus creating a full certificate. It then sends the certificate - typically in PEM or CER format - back to the user.
3. Merging the certificate with the private key.
The user merges the public certificate they received from the CA with the private key they generated on step 1. This may take different forms depending on where the private key is stored. If the private key was saved in a file, the user merges it with the certificate to form an all-in-one PFX or PEM file. If the key is stored on an HSM, the user imports the new certificate onto the HSM. If the key is published in PKI Proxy, the user attaches the certificate to the shared keypair.
CSRs and PKI Proxy
The alliance of PKI Proxy and the CSR flow takes certificate and key management possibilities to a whole new level, and opens doors to a variety of Cloud-based and key virtualization setups. One example that we will discuss in this article is based on a scenario where the keypair is generated in a FIPS-certified Cloud key vault, and then used, via a CSR, as a basis for soliciting a CA-issued certificate. The resulting certificate can then be used across company's multiple workstations seamlessly as if it was stored locally on each of them, while still offering benefits of FIPS 140 security provided by the Cloud vault.
We will base our example on the three-step routine described above, elaborating on each step along the way.
1. Generating a keypair
1.1. Generating a keypair in Azure Vault
We will use the Microsoft Azure Vault service to generate and store the keypair. You can use any other supported storage type in your setting, such as PKCS#11 or other types of Cloud HSMs.
To generate a keypair, open your Microsoft Azure portal and navigate to your key vault. In the menu at the left, expand the Objects category and click on its Keys entry:
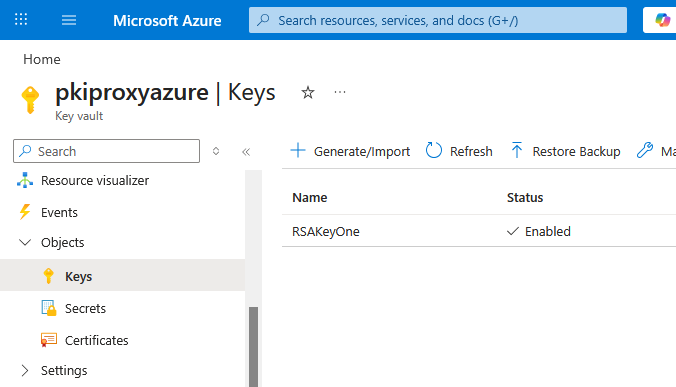
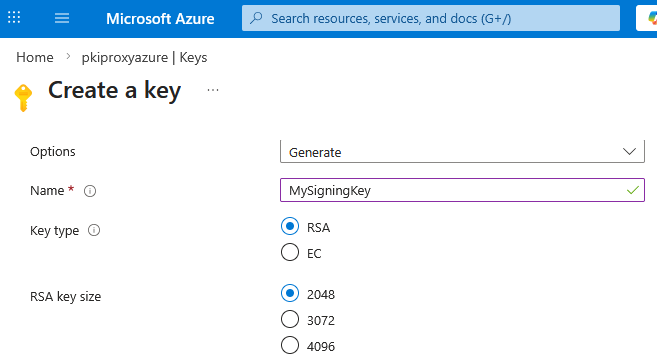
Click on the Generate/Import button. Choose a name for your new key (for example, MySigningKey) and the required type and strength:
That's done.
1.2. Sharing the keypair in PKI Proxy
Let's now share this key in PKI Proxy. Open PKI Proxy and take the following steps:
- Click on the New... button at the right to invoke a sharing dialog.
- Click on Select Certificate or Key... button at the top of the dialog.
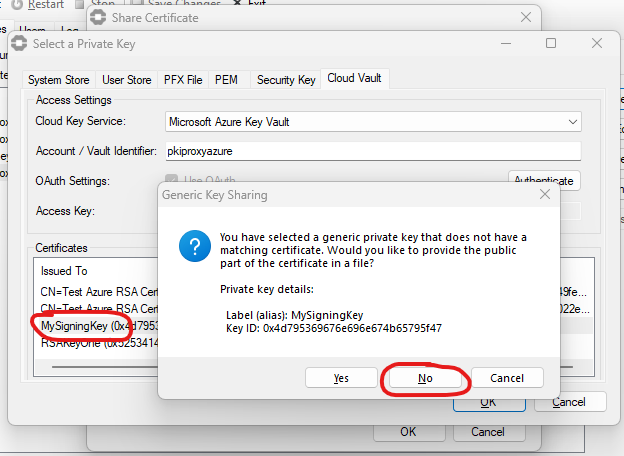
- Switch to the Cloud Vault tab at the top. Select Microsoft Azure Key Vault in the combo box. Provide the name of your key vault and click the Authenticate button. The browser will open to confirm your permissions as PKI Proxy requests access to your key vault. Once the authorization procedure completes, you should see your new key in the Certificates and Keys list at the bottom.
- Pick the appropriate keypair (MySigningKey) from the list and click OK. PKI Proxy will show a warning that you are sharing
a generic key, and will suggest to associate a certificate with this key right away. Answer No: we want to share the generic key on this stage, and associate the certificate later.
- Provide a friendly alias for the shared key and set up a user, then click OK:
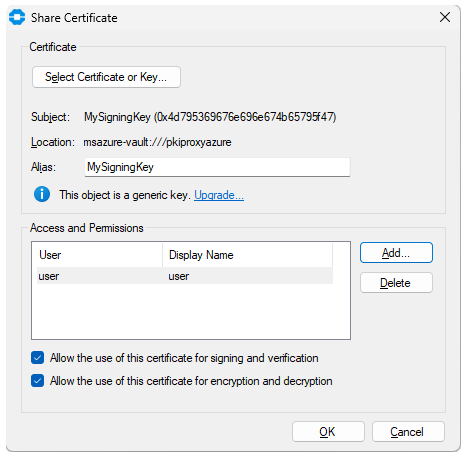
Note that we used the MySigningKey alias for the keypair, which matches the alias that we used for the key in the Azure Key Vault. This is not a requirement: your PKI Proxy key alias is completely independent from any aliases used by the key vaults and does not need to match them.
The keypair is now shared by PKI Proxy and should be accessible for clients. We can now proceed to generating the CSR over the keypair.
1.3. Generating a CSR over the keypair
CSRs can be generated interactively in the main PKI Proxy application, or using pkptool, a PKI Proxy command-line scripting and automation tool. To initiate the CSR generation flow in the application, click on the Upgrade... link in the Share Certificate dialog of the keypair, and select the Generate a certification request (CSR) option when asked. Follow the steps of the wizard to provide the details of the CSR and save the created certificate request to a file.
To generate a CSR with pkptool, open your console window (Win+R, type cmd, Enter) and navigate to the tools directory within the PKI Proxy installation directory:
C:\Users\user>cd "C:\Program Files\PKI Proxy 2024\tools"
C:\Program Files\PKI Proxy 2024\tools>
It is a good idea to start with verifying that the PKI Proxy service is accessible and the keys we shared are listed (adjust -l, -u, and -p parameters as required for your copy of PKI Proxy):
pkptool list -l http://127.0.0.1:9266 -u user -p password
Your output should look like shown on the screen capture below, with two keys shown (the public and the private one). If you don't get output like this, make sure that PKI Proxy service is running, and that the access credentials are correct.

Generating a CSR starts with preparing its definitions file. This is a simple configuration file that lists the details that need to be included in the CSR. The content of a typical definitions file is shown below:
[ req ]

distinguished_name	= req_distinguished_name
req_extensions = v3_req

[ req_distinguished_name ]

countryName			= FR
stateOrProvinceName		= Bretagne
localityName			= Rennes
organizationName		= Pierre Papier et Ciseaux Sarl
organizationalUnitName		= Bureau
commonName			= Pierre Grosse
emailAddress			= pierre@email.com

[ v3_req ]

basicConstraints = CA:FALSE
keyUsage = nonRepudiation, digitalSignature, keyEncipherment
The format of the definitions file matches that used by OpenSSL.
Use Notepad or similar editor to create a definitions file and save it to an accessible location - such as C:\Documents\req.cnf.
Now that we have a shared keypair and the request template, we are ready to generate a CSR. Get back to the command line window and type this command:
pkptool req -l http://127.0.0.1:9266 -u user -p password -label MySigningKey -in C:\Documents\req.cnf -outform PEM -out C:\Documents\MySigningKey.csr
Let's have a closer look at this command:
- The req command tells pkptool to generate a certificate signing request.
- The -label parameter specifies the label of the key pair that we want to generate our CSR over. It is mandatory that both the public and private key are available. Alternatively, you can reference the keypair using its ID (-id 4d795369676e696e674b65795f47444130313739343035393046)
- The -in parameter tells pkptool the location of the definitions file for the request.
- The -outform and -out parameters specify the output format (base64-encoded PEM) and location where the new request should be saved.
Let's have a look into the new CSR. We can use OpenSSL to dump the content of the request in a human-readable way:
openssl req -inform pem -verify -text -in C:\Documents\MySigningKey.csr
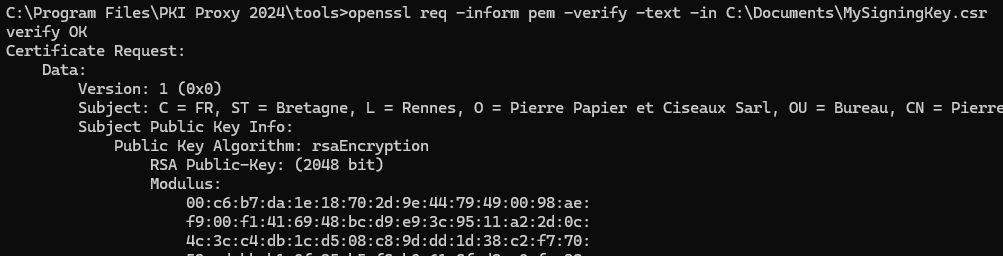
That is it. We can now send our new CSR to a CA to solicit a certificate.
2. Sending the CSR to a CA
For the purpose of this article we will take a little shortcut. Instead of sending our CSR to a CA, we will take a role of the CA upon ourselves, and process the request locally using OpenSSL.
The resulting certificate will not be trusted (since we are not a registered CA), but that will be the only difference from the routine that a real CA would follow. A full-blown CA will take very similar steps to generate your certificate, except for it will also make sure that you have the right to possess that certificate legally.
To generate a certificate from the CSR, you will need another certificate (a "CA certificate") that you will use for signing the request. You can generate it yourself with OpenSSL using this command:
openssl req -x509 -sha256 -days 1825 -newkey rsa:2048 -keyout C:\Documents\rootCA.key -out C:\Documents\rootCA.cer
This certificate will act as your local CA certificate. This emulates the CA's own certificate that will be listed under the "Issuer" section of your new certificate.
Now that we have a CA certificate, let's sign the CSR:
openssl x509 -req -CA C:\Documents\rootCA.cer -CAkey C:\Documents\rootCA.key -in C:\Documents\MySigningKey.csr -out C:\Documents\MySigningKey.cer -days 365 -CAcreateserial
The MySigningKey.cer file created as a result of this call contains the certificate that was generated by our imaginary CA over the CSR file:
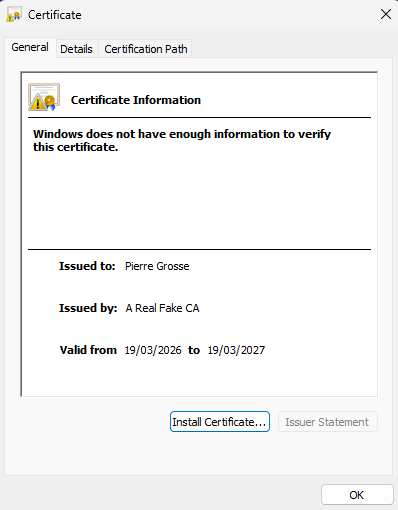
The CA can now send this certificate - which only contains the public part - back to the requestor.
3. Merging the certificate with the private key.
Upon receiving the certificate from the CA, we need to associate it with the generic keypair that we had used to create the CSR.
Get back to PKI Proxy, select your keypair in the list of shared objects, and click the Edit... button on the right. On the dialog that appears, click the Upgrade link and select the Provide a matching public certificate in a file option:
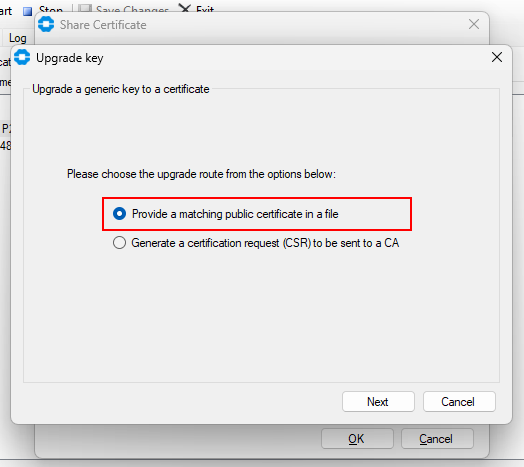
In the file dialog that appears, navigate to C:\Documents to pick the MySigningKey.cer file. The shared object has now been converted from a generic keypair to a certificate. Click OK to close the Edit dialog.
Get back to the command line and verify that a certificate object can now be seen in the list of shared objects:
pkptool list -l http://127.0.0.1:9266 -u user -p password
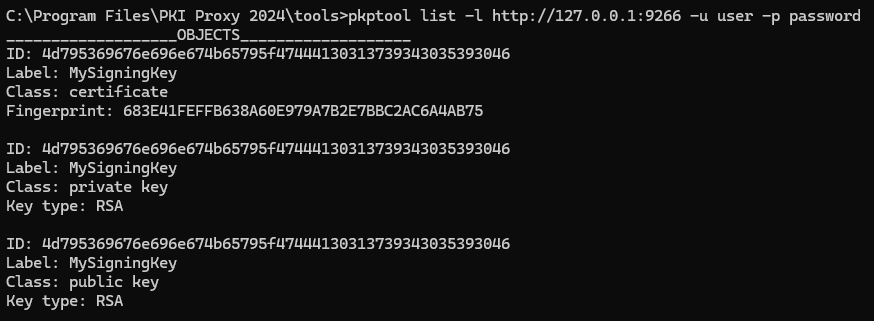
That is it. PKI Proxy is now sharing a certificate with the public part stored locally on your system, and the private key stored in your Azure vault as a generic keypair.
You can now use this certificate, for example, by importing it to the MY store, and using it with signtool to sign executables (Signing with SignTool) or with Adobe Reader to sign PDF documents (Signing with Adobe).
Additional Settings
All settings for PKI Proxy are stored in the Windows registry in HKEY_CURRENT_USER\SOFTWARE\nsoftware\PKIProxy\24. This registry key holds settings that are available for the product. This include typical settings that are managed through the UI, as well as additional settings which can only be set by modifying the registry key directly.
The following keys hold configuration information:
| Registry Key | Applicable Settings |
| HKEY_CURRENT_USER\SOFTWARE\nsoftware\PKIProxy\24 | Global settings for the application. |
| HKEY_CURRENT_USER\SOFTWARE\nsoftware\PKIProxy\24\Services\{GUID}\Certificates | Certificates holds certificate specific settings. |
| HKEY_CURRENT_USER\SOFTWARE\nsoftware\PKIProxy\24\Services\{GUID}\Users | Users holds user specific settings. |
The following values can be configured within the root HKEY_CURRENT_USER\SOFTWARE\nsoftware\PKIProxy\24 registry key:
Registry Keys
The following values can be configured for the service:
| Name | Type | Description | ||||||||||||
| AllowedClients | String | This setting defines a comma-separated list of host names or IPv4 addresses that may access the server. When a client connects, the client's address is checked against the list defined here. If there is no match, the client will be disconnected. The wildcard character "*" is supported. The default value is "*" and all connections are accepted. | ||||||||||||
| AllowedTimeSkew | DWORD | Specifies the allowed time difference between the client system and the system where PKI Proxy performs signing, in seconds. When not specified (default) if requests originate from a remote machine the clock on the remote machine and the clock on the system where PKI Proxy is running must not be more than 300 seconds apart or signing will fail. This setting may be used to adjust the limit of acceptable time difference between systems (in seconds). | ||||||||||||
| DeleteLogDays | DWORD | The number of days after which old log files will be deleted. This is only applicable when RotateLogDays is set to a positive value. | ||||||||||||
| EnableTLS | DWORD | Whether or not to enable TLS for incoming connections. By default, TLS is enabled. | ||||||||||||
| LogFile | String | The path to the log file. | ||||||||||||
| LogMode | DWORD | This registry key controls the level of log messages. Possible values are:
| ||||||||||||
| LogToFile | DWORD | This registry key controls whether log messages are written to a file. | ||||||||||||
| MgmtCred | DWORD | This registry key is an internal setting used by PKI Proxy to ensure secure communication between the PKI Proxy Management Console and the PKI Proxy sharing service. | ||||||||||||
| Port | DWORD | The port at which the service will listen for incoming connections. | ||||||||||||
| RotateLogDays | DWORD | The number of days after which the log file will be rotated. Old log files will be renamed to the format "logname-yyyy-MM-dd". When set to a positive value DeleteLogDays is applicable. | ||||||||||||
| ServiceType | DWORD | This registry key is an internal setting that maintains the role of the PKI Proxy installation. | ||||||||||||
| TLSCertFingerprint | String | The fingerprint of the service's TLS certificate. For instance 39C57481E978114FE7F164EB4E654B6B87787377. | ||||||||||||
| TLSCertLocation | String | The path to the service's TLS certificate. | ||||||||||||
| TLSCertPass | String | The password for the service's TLS certificate. | ||||||||||||
| TLSCertValue | String | If the type of certificate is a PEM string, then this registry key is used to store that string. | ||||||||||||
| UseAsSystemService | DWORD | This registry key indicates whether the sharing service will run as a system service or a regular background process. This is an informational record; changing it in the registry will not affect the startup mode. |
Certificates
Certificate Settings
The following values can be configured for each shared certificate:
| Name | Type | Description | ||||||||
| AllowEncrypt | DWORD | Whether to allow the certificate to be used for encryption. | ||||||||
| AllowSign | DWORD | Whether to allow the certificate to be used for signing. | ||||||||
| AuthErrorThreshold | DWORD | The number of consecutive outbound authentication failures before the certificate is disabled. This is set to 2 by default for PKCS#11-based certificates to avoid accidental PIN locking. The value of 0 indicates no threshold. | ||||||||
| AuthFailedAttempts | DWORD | Contains the current number of consecutive authentication failures. A successful authentication drops this value to 0. If this setting reaches the number assigned to AuthErrorThreshold, the certificate is automatically disabled and has to be re-enabled in PKI Proxy UI. | ||||||||
| CertAlias | String | An alias to use for the certificate. | ||||||||
| CertFingerprint | String | The signing certificate's fingerprint. | ||||||||
| Credential | String | This registry key holds the password for the signing certificate. The password is encrypted using DPAPI before storage. | ||||||||
| Enabled | DWORD | Whether the certificate is enabled. | ||||||||
| EnableFullDataFallback | DWORD | When enabled, this setting allows the service to override the LargeDataThreshold setting and use the default hash-and-sign algorithm for this request even if it exceeds the threshold. This setting is enabled by default. | ||||||||
| Expires | String | The signing certificate's expiration date. For instance 2025-12-26 20:12:34 | ||||||||
| LargeDataThreshold | DWORD | Specifies the maximum length of the input data which will be sent to the HSM for signing. If the input data is below the threshold, the data to sign is sent to the HSM and the HSM calculates the hash over the data, signs it, and returns the signature. If the input data exceeds the threshold, the service calculates the hash itself, and passes the hash, not the data, to the HSM for signing. In most cases this setting should not be adjusted. The default value is 1KB for HSM-based certificates. For all other certificates, the default value is 200KB. | ||||||||
| Location | String | The path to the signing certificate. | ||||||||
| Notification | DWORD | The Notification key specifies the type of alerts the user receives whenever the signature is requested by a remote party. The following values are supported:
| ||||||||
| Subject | String | The signing certificate's subject. | ||||||||
| UserIds | String | The ids of the users which may use the certificate. | ||||||||
| SignaturePolicy | String | The signature policy parameters to include in the PKCS#7 signatures made with this certificate. The following format is assumed:
policy-id;hash-algorithm=policy-hash[;uri=policy-URI][;text=policy-text] Examples:
|
Users
User Settings
The following values can be configured for each users:
| Name | Type | Description | ||||||||
| Credential | String | The user's credentials. Credentials are encrypted using DPAPI before storage | ||||||||
| CredentialType | DWORD | The type of credential the user can use for authentication. Possible values are:
| ||||||||
| DisplayName | DWORD | The user's display name. | ||||||||
| Enabled | DWORD | Whether the user is enabled. | ||||||||
| SystemUserAccount | String | The user's account name for NTLM authentication. It contains the system name of the Windows principal that is matched to the PKI Proxy user. |