Frequently Asked Questions
Use this chapter to find answers to questions that are often asked in our support channels. Many questions are quite typical and may have already been covered in this section. If your question is one of them, looking up the answer here may help you much more quickly than waiting for the support team's answer.
This chapter is being constantly updated in sync with our support experience.
Supported Platforms
What platforms do you support, and what edition is right for me?
SecureBlackbox supports a number of operating platforms. As you probably noticed, some platforms are supported by more than one edition. For example, Android is supported by the Java edition, C++ edition, and Delphi edition. Which one to choose?
In most cases, the choice of the platform is substantiated by the development environment that you use or prefer to use. In the above example with Android, if you use Java for your Android development, the Java edition would be the right one to choose. If you use FireMonkey with Delphi, the Delphi edition would be a more appropriate choice.
For your convenience, we are presenting the answer from two viewpoints: from the viewpoint of someone with a specific target platform, needing to make a decision about the product edition to use, and from the viewpoint of someone interested in knowing a set of platforms supported by a particular SecureBlackbox edition.
My target platform is...
Windows
Most development environments and SDKs are available for Windows, so virtually any SecureBlackbox edition can be used to develop for this popular platform. The only exception is the macOS edition, which targets the macOS or iOS platforms.
Linux
For Linux you can also develop with a variety of editions:
- with the .NET edition using Visual Studio Code and .NET Core
- with the Java edition, running your applications on the Linux JVM
- with the Delphi edition using the Embarcadero Linux compiler, FreePascal/Lazarus, or CodeTyphon
- with the C++ edition using g++
- with PHP or Python editions using their respective interpreters.
Mac OS X
The following editions support development for Mac OS X:
- .NET edition using Visual Studio Code and .NET Core
- C++ edition using Objective C or Swift
- Delphi edition using Embarcadero compilers for Mac OS or FreePascal
- Java edition
- Python and PHP editions
Android
Android is supported by the Java edition (pure Java for Android JVM), C++ edition, and Delphi edition using the Embarcadero Android compiler.
iOS
iOS is supported by the macOS edition (Swift) and Delphi edition (Embarcadero iOS compiler).
I develop with ... edition, what platforms can I create apps for?
.NET edition
With the .NET edition you can create applications for Windows (.NET Framework, .NET Standard), Linux (.NET Standard), Mac OS X (.NET Standard), and Windows Mobile (.NET CF). You can use any compatible CLR language, including C# and VB.NET.
Java edition
The Java edition supports all platforms that have an associated full JVM. This includes Windows, Linux, and Mac OS X. It can also be used to develop Java apps for Android with Android Studio.
Delphi edition
The Delphi edition supports all Embarcadero compilers, allowing you to create applications based on classic VCL and FireMonkey, as well as FreePascal. This means that you can use it to develop for Windows, Linux, Mac OS X, Android, and iOS. The source code can also be built for ARM (Raspbian) using FreePascal.
The Delphi Edition - Backwards Compatibility Pack variant can also be used in C++ Builder projects.
C++ edition
The C++ edition can be used to develop for Windows, Linux, Mac OS X, and Android (natively).
macOS edition
The macOS edition offers support for Objective C and Swift.
C++ Builder edition
The C++ Builder edition (not to be confused with the C++ edition) supports Windows using Embarcadero C++ Builder compilers.
PHP and Python editions
The PHP and Python editions can be used with the respective interpreters on Windows, Linux, and Mac OS X.
Supported Algorithms
This page answers the most commom questions about the scope of algorithms and technologies supported by SecureBlackbox, all in one place.
Please note that higher-level technologies often use their own variations of algorithms, which may see a particular algorithm not being supported with that particular technology. For example, TLS does not define ciphersuites to be used with TWOFISH, so while this algorithm is supported by SecureBlackbox in general, it won't be available in the TLS components.
Symmetric cryptography
Here is a comprehensive list of symmetric algorithms supported by SecureBlackbox.
- AES (Rijndael): 128, 192, and 256 bit
- Blowfish: 128 to 448 bit
- Camellia: 128, 192, and 256 bit
- CAST5: 128 bit
- ChaCha20: 256 bit
- DES: 56 bit
- 3DES-EDE: 168 bit
- IDEA: 128 bit
- RC2: 128 bit
- RC4: 64-128 bit (stream cipher)
- Serpent: 128, 192, and 256 bit
- Twofish: 128, 192, and 256 bit
The following symmetric cipher modes are supported: ECB, CBC, CTR, CFB8, GCM, CCM (AEAD).
Public key cryptography
The following public key (asymmetric) cryptographic algorithms are supported:
- RSA (PKCS#1, OAEP, and PSS variants)
- ECDSA (see the list of supported curves below)
- EdDSA (curve 448, curve 25519)
- ElGamal
- DSA
- Diffie-Hellman
- ML-DSA (parameter sets: 44, 65, 87, and HashML-DSA)
Supported Elliptic Curves:
- SEC2 recommended curves over a prime field (SECP112R1, SECP112R2, SECP128R1, SECP128R2, SECP160K1, SECP160R1, SECP160R2, SECP192K1, SECP192R1, SECP224K1, SECP224R1, SECP256K1, SECP256R1, SECP384R1, SECP521R1)
- SEC2 recommended curves over an extended binary field (SECT113R1, SECT113R2, SECT131R1, SECT131R2, SECT163K1, SECT163R1, SECT163R2, SECT193R1, SECT193R2, SECT233K1, SECT233R1, SECT239K1, SECT283K1, SECT283R1, SECT409K1, SECT409R1, SECT571K1, SECT571R1)
- X9.62 recommended curves over a prime field (PRIME192V1, PRIME192V2, PRIME192V3, PRIME239V1, PRIME239V2, PRIME239V3, PRIME256V1)
- X9.62 recommended curves over an extended binary field (C2PNB163V1, C2PNB163V2, C2PNB163V3, C2PNB176W1, C2TNB191V1, C2TNB191V2, C2TNB191V3, C2ONB191V4, C2ONB191V5, C2PNB208W1, C2TNB239V1, C2TNB239V2, C2TNB239V3, C2ONB239V4, C2ONB239V5, C2PNB272W1, C2PNB304W1, C2TNB359V1, C2PNB368W1, C2TNB431R1)
- NIST recommended curves over a prime field (P192, P224, P256, P384, P521)
- NIST recommended curves over an extended binary field (B163, B233, B283, B409, B571)
- NIST recommended Koblitz curves (K163, K233, K283, K409, K571)
- Brainpool curves (P160R1, P160T1, P192R1, P192T1, P224R1, P224T1, P256R1, P256T1, P320R1, P320T1, P384R1, P384T1, P512R1, P512T1)
- Edwards curves (curve 25519, curve 448)
Hash algorithms
The following hash algorithms are supported.
- SHA256
- SHA384
- SHA512
- SHA224
- SHA3-256
- SHA3-384
- SHA3-512
- SHA3-224
- RIPEMD160
- Whirlpool
- Poly1305
- Argon2
- Blake2
- SHAKE
- SHA1
- MD5
- MD4
- MD2
- CRC32 (*)
- HMAC (SHA1, SHA2, SHA3, RIPEMD160-based)
- UMAC
(*) CRC is not exactly a hash algorithm, but we include it in this category for being close enough to it.
Key derivation algorithms
The following hash algorithms are supported.
- PKCS5 (with alias of PBKDF2)
- BCrypt
- SCrypt
- Argon2d
- Argon2i
- Argon2id
TLS ciphersuites
Below follows a comprehensive list of ciphersuites supported by SecureBlackbox. Note that not all of the ciphersuites are enabled by default, and, when enabled, some have higher priorities than others.- NULL_NULL_NULL
- RSA_NULL_MD5
- RSA_NULL_SHA
- RSA_RC4_MD5
- RSA_RC4_SHA
- RSA_RC2_MD5
- RSA_IDEA_MD5
- RSA_IDEA_SHA
- RSA_DES_MD5
- RSA_DES_SHA
- RSA_3DES_MD5
- RSA_3DES_SHA
- RSA_AES128_SHA
- RSA_AES256_SHA
- DH_DSS_DES_SHA
- DH_DSS_3DES_SHA
- DH_DSS_AES128_SHA
- DH_DSS_AES256_SHA
- DH_RSA_DES_SHA
- DH_RSA_3DES_SHA
- DH_RSA_AES128_SHA
- DH_RSA_AES256_SHA
- DHE_DSS_DES_SHA
- DHE_DSS_3DES_SHA
- DHE_DSS_AES128_SHA
- DHE_DSS_AES256_SHA
- DHE_RSA_DES_SHA
- DHE_RSA_3DES_SHA
- DHE_RSA_AES128_SHA
- DHE_RSA_AES256_SHA
- DH_ANON_RC4_MD5
- DH_ANON_DES_SHA
- DH_ANON_3DES_SHA
- DH_ANON_AES128_SHA
- DH_ANON_AES256_SHA
- RSA_RC2_MD5_EXPORT
- RSA_RC4_MD5_EXPORT
- RSA_DES_SHA_EXPORT
- DH_DSS_DES_SHA_EXPORT
- DH_RSA_DES_SHA_EXPORT
- DHE_DSS_DES_SHA_EXPORT
- DHE_RSA_DES_SHA_EXPORT
- DH_ANON_RC4_MD5_EXPORT
- DH_ANON_DES_SHA_EXPORT
- RSA_CAMELLIA128_SHA
- DH_DSS_CAMELLIA128_SHA
- DH_RSA_CAMELLIA128_SHA
- DHE_DSS_CAMELLIA128_SHA
- DHE_RSA_CAMELLIA128_SHA
- DH_ANON_CAMELLIA128_SHA
- RSA_CAMELLIA256_SHA
- DH_DSS_CAMELLIA256_SHA
- DH_RSA_CAMELLIA256_SHA
- DHE_DSS_CAMELLIA256_SHA
- DHE_RSA_CAMELLIA256_SHA
- DH_ANON_CAMELLIA256_SHA
- PSK_RC4_SHA
- PSK_3DES_SHA
- PSK_AES128_SHA
- PSK_AES256_SHA
- DHE_PSK_RC4_SHA
- DHE_PSK_3DES_SHA
- DHE_PSK_AES128_SHA
- DHE_PSK_AES256_SHA
- RSA_PSK_RC4_SHA
- RSA_PSK_3DES_SHA
- RSA_PSK_AES128_SHA
- RSA_PSK_AES256_SHA
- RSA_SEED_SHA
- DH_DSS_SEED_SHA
- DH_RSA_SEED_SHA
- DHE_DSS_SEED_SHA
- DHE_RSA_SEED_SHA
- DH_ANON_SEED_SHA
- SRP_SHA_3DES_SHA
- SRP_SHA_RSA_3DES_SHA
- SRP_SHA_DSS_3DES_SHA
- SRP_SHA_AES128_SHA
- SRP_SHA_RSA_AES128_SHA
- SRP_SHA_DSS_AES128_SHA
- SRP_SHA_AES256_SHA
- SRP_SHA_RSA_AES256_SHA
- SRP_SHA_DSS_AES256_SHA
- ECDH_ECDSA_NULL_SHA
- ECDH_ECDSA_RC4_SHA
- ECDH_ECDSA_3DES_SHA
- ECDH_ECDSA_AES128_SHA
- ECDH_ECDSA_AES256_SHA
- ECDHE_ECDSA_NULL_SHA
- ECDHE_ECDSA_RC4_SHA
- ECDHE_ECDSA_3DES_SHA
- ECDHE_ECDSA_AES128_SHA
- ECDHE_ECDSA_AES256_SHA
- ECDH_RSA_NULL_SHA
- ECDH_RSA_RC4_SHA
- ECDH_RSA_3DES_SHA
- ECDH_RSA_AES128_SHA
- ECDH_RSA_AES256_SHA
- ECDHE_RSA_NULL_SHA
- ECDHE_RSA_RC4_SHA
- ECDHE_RSA_3DES_SHA
- ECDHE_RSA_AES128_SHA
- ECDHE_RSA_AES256_SHA
- ECDH_ANON_NULL_SHA
- ECDH_ANON_RC4_SHA
- ECDH_ANON_3DES_SHA
- ECDH_ANON_AES128_SHA
- ECDH_ANON_AES256_SHA
- RSA_NULL_SHA256
- RSA_AES128_SHA256
- RSA_AES256_SHA256
- DH_DSS_AES128_SHA256
- DH_RSA_AES128_SHA256
- DHE_DSS_AES128_SHA256
- DHE_RSA_AES128_SHA256
- DH_DSS_AES256_SHA256
- DH_RSA_AES256_SHA256
- DHE_DSS_AES256_SHA256
- DHE_RSA_AES256_SHA256
- DH_ANON_AES128_SHA256
- DH_ANON_AES256_SHA256
- RSA_AES128_GCM_SHA256
- RSA_AES256_GCM_SHA384
- DHE_RSA_AES128_GCM_SHA256
- DHE_RSA_AES256_GCM_SHA384
- DH_RSA_AES128_GCM_SHA256
- DH_RSA_AES256_GCM_SHA384
- DHE_DSS_AES128_GCM_SHA256
- DHE_DSS_AES256_GCM_SHA384
- DH_DSS_AES128_GCM_SHA256
- DH_DSS_AES256_GCM_SHA384
- DH_ANON_AES128_GCM_SHA256
- DH_ANON_AES256_GCM_SHA384
- ECDHE_ECDSA_AES128_SHA256
- ECDHE_ECDSA_AES256_SHA384
- ECDH_ECDSA_AES128_SHA256
- ECDH_ECDSA_AES256_SHA384
- ECDHE_RSA_AES128_SHA256
- ECDHE_RSA_AES256_SHA384
- ECDH_RSA_AES128_SHA256
- ECDH_RSA_AES256_SHA384
- ECDHE_ECDSA_AES128_GCM_SHA256
- ECDHE_ECDSA_AES256_GCM_SHA384
- ECDH_ECDSA_AES128_GCM_SHA256
- ECDH_ECDSA_AES256_GCM_SHA384
- ECDHE_RSA_AES128_GCM_SHA256
- ECDHE_RSA_AES256_GCM_SHA384
- ECDH_RSA_AES128_GCM_SHA256
- ECDH_RSA_AES256_GCM_SHA384
- PSK_AES128_GCM_SHA256
- PSK_AES256_GCM_SHA384
- DHE_PSK_AES128_GCM_SHA256
- DHE_PSK_AES256_GCM_SHA384
- RSA_PSK_AES128_GCM_SHA256
- RSA_PSK_AES256_GCM_SHA384
- PSK_AES128_SHA256
- PSK_AES256_SHA384
- PSK_NULL_SHA256
- PSK_NULL_SHA384
- DHE_PSK_AES128_SHA256
- DHE_PSK_AES256_SHA384
- DHE_PSK_NULL_SHA256
- DHE_PSK_NULL_SHA384
- RSA_PSK_AES128_SHA256
- RSA_PSK_AES256_SHA384
- RSA_PSK_NULL_SHA256
- RSA_PSK_NULL_SHA384
- RSA_CAMELLIA128_SHA256
- DH_DSS_CAMELLIA128_SHA256
- DH_RSA_CAMELLIA128_SHA256
- DHE_DSS_CAMELLIA128_SHA256
- DHE_RSA_CAMELLIA128_SHA256
- DH_ANON_CAMELLIA128_SHA256
- RSA_CAMELLIA256_SHA256
- DH_DSS_CAMELLIA256_SHA256
- DH_RSA_CAMELLIA256_SHA256
- DHE_DSS_CAMELLIA256_SHA256
- DHE_RSA_CAMELLIA256_SHA256
- DH_ANON_CAMELLIA256_SHA256
- ECDHE_ECDSA_CAMELLIA128_SHA256
- ECDHE_ECDSA_CAMELLIA256_SHA384
- ECDH_ECDSA_CAMELLIA128_SHA256
- ECDH_ECDSA_CAMELLIA256_SHA384
- ECDHE_RSA_CAMELLIA128_SHA256
- ECDHE_RSA_CAMELLIA256_SHA384
- ECDH_RSA_CAMELLIA128_SHA256
- ECDH_RSA_CAMELLIA256_SHA384
- RSA_CAMELLIA128_GCM_SHA256
- RSA_CAMELLIA256_GCM_SHA384
- DHE_RSA_CAMELLIA128_GCM_SHA256
- DHE_RSA_CAMELLIA256_GCM_SHA384
- DH_RSA_CAMELLIA128_GCM_SHA256
- DH_RSA_CAMELLIA256_GCM_SHA384
- DHE_DSS_CAMELLIA128_GCM_SHA256
- DHE_DSS_CAMELLIA256_GCM_SHA384
- DH_DSS_CAMELLIA128_GCM_SHA256
- DH_DSS_CAMELLIA256_GCM_SHA384
- DH_ANON_CAMELLIA128_GCM_SHA256
- DH_ANON_CAMELLIA256_GCM_SHA384
- ECDHE_ECDSA_CAMELLIA128_GCM_SHA256
- ECDHE_ECDSA_CAMELLIA256_GCM_SHA384
- ECDH_ECDSA_CAMELLIA128_GCM_SHA256
- ECDH_ECDSA_CAMELLIA256_GCM_SHA384
- ECDHE_RSA_CAMELLIA128_GCM_SHA256
- ECDHE_RSA_CAMELLIA256_GCM_SHA384
- ECDH_RSA_CAMELLIA128_GCM_SHA256
- ECDH_RSA_CAMELLIA256_GCM_SHA384
- PSK_CAMELLIA128_GCM_SHA256
- PSK_CAMELLIA256_GCM_SHA384
- DHE_PSK_CAMELLIA128_GCM_SHA256
- DHE_PSK_CAMELLIA256_GCM_SHA384
- RSA_PSK_CAMELLIA128_GCM_SHA256
- RSA_PSK_CAMELLIA256_GCM_SHA384
- PSK_CAMELLIA128_SHA256
- PSK_CAMELLIA256_SHA384
- DHE_PSK_CAMELLIA128_SHA256
- DHE_PSK_CAMELLIA256_SHA384
- RSA_PSK_CAMELLIA128_SHA256
- RSA_PSK_CAMELLIA256_SHA384
- ECDHE_PSK_CAMELLIA128_SHA256
- ECDHE_PSK_CAMELLIA256_SHA384
- ECDHE_PSK_RC4_SHA
- ECDHE_PSK_3DES_SHA
- ECDHE_PSK_AES128_SHA
- ECDHE_PSK_AES256_SHA
- ECDHE_PSK_AES128_SHA256
- ECDHE_PSK_AES256_SHA384
- ECDHE_PSK_NULL_SHA
- ECDHE_PSK_NULL_SHA256
- ECDHE_PSK_NULL_SHA384
- ECDHE_RSA_CHACHA20_POLY1305_SHA256
- ECDHE_ECDSA_CHACHA20_POLY1305_SHA256
- DHE_RSA_CHACHA20_POLY1305_SHA256
- PSK_CHACHA20_POLY1305_SHA256
- ECDHE_PSK_CHACHA20_POLY1305_SHA256
- DHE_PSK_CHACHA20_POLY1305_SHA256
- RSA_PSK_CHACHA20_POLY1305_SHA256
- AES128_GCM_SHA256
- AES256_GCM_SHA384
- CHACHA20_POLY1305_SHA256
- AES128_CCM_SHA256
- AES128_CCM8_SHA256
SSH algorithms
The following SSH algorithms are supported. All ciphers are given in the notation used in the SSH specification.
- Symmetric key algorithms: aes128-gcm, aes256-gcm, aes128-gcm@openssh.com, aes256-gcm@openssh.com, chacha20-poly1305, chacha20-poly1305@openssh.com, aes128-ctr, aes192-ctr, aes256-ctr, 3des-ctr, blowfish-ctr, twofish128-ctr, twofish192-ctr, twofish256-ctr, serpent128-ctr, serpent192-ctr, serpent256-ctr, idea-ctr, cast128-ctr, arcfour128, arcfour256, 3des-cbc, blowfish-cbc, twofish256-cbc, twofish192-cbc, twofish128-cbc, aes256-cbc, aes192-cbc, aes128-cbc, serpent256-cbc, serpent192-cbc, serpent128-cbc, arcfour, idea-cbc, cast128-cbc, des-cbc, none
- Public key algorithms: ssh-dss, ssh-rsa, x509v3-sign-rsa, x509v3-sign-dss, ssh-ed25519, ssh-ed448 ecdsa-sha2-nistp256, ecdsa-sha2-nistp384, ecdsa-sha2-nistp521, ecdsa-sha2-nistk163, ecdsa-sha2-nistp192, ecdsa-sha2-nistp224, ecdsa-sha2-nistk233, ecdsa-sha2-nistb233, ecdsa-sha2-nistk283, ecdsa-sha2-nistk409, ecdsa-sha2-nistb409, ecdsa-sha2-nistt571, ecdsa-sha2-curve25519, x509v3-ssh-rsa, x509v3-ssh-dss, x509v3-rsa2048-sha256, x509v3-ecdsa-sha2-nistp256, x509v3-ecdsa-sha2-nistp384, x509v3-ecdsa-sha2-nistp521, x509v3-ecdsa-sha2-nistk163, x509v3-ecdsa-sha2-nistp192, x509v3-ecdsa-sha2-nistp224, x509v3-ecdsa-sha2-nistk233, x509v3-ecdsa-sha2-nistb233, x509v3-ecdsa-sha2-nistk283, x509v3-ecdsa-sha2-nistk409, x509v3-ecdsa-sha2-nistb409, x509v3-ecdsa-sha2-nistt571, x509v3-ecdsa-sha2-curve25519, ssh-ed25519, ssh-ed448, rsa-sha2-256, rsa-sha2-512
- Key exchange algorithms: diffie-hellman-group-exchange-sha1, diffie-hellman-group1-sha1, diffie-hellman-group14-sha1, diffie-hellman-group-exchange-sha256, rsa1024-sha1, rsa2048-sha256, ecdh-sha2-nistp256, ecdh-sha2-nistp384, ecdh-sha2-nistp521, ecdh-sha2-nistk163, ecdh-sha2-nistp192, ecdh-sha2-nistp224, ecdh-sha2-nistk233, ecdh-sha2-nistb233, ecdh-sha2-nistk283, ecdh-sha2-nistk409, ecdh-sha2-nistb409, ecdh-sha2-nistt571, ecdh-sha2-curve25519, curve25519-sha256@libssh.org, curve448-sha512@libssh.org gss-gex-sha1-*, gss-group1-sha1-*, gss-group14-sha1-*, diffie-hellman-group14-sha256, diffie-hellman-group15-sha512, diffie-hellman-group16-sha512, diffie-hellman-group17-sha512, diffie-hellman-group18-sha512
- Hash (MAC) algorithms: hmac-sha1, hmac-sha1-96, hmac-md5, hmac-md5-96, hmac-ripemd160, hmac-ripemd, hmac-ripemd160@openssh.com, hmac-sha256@ssh.com, hmac-sha256-96@ssh.com, umac-32@openssh.com, umac-64@openssh.com, umac-96@openssh.com, umac-128@openssh.com, hmac-sha2-256, hmac-sha2-512, aes128-gcm, aes256-gcm, chacha20-poly1305@openssh.com, hmac-sha2-256-etm@openssh.com, hmac-sha2-512-etm@openssh.com, none
Delphi Edition Variants
SecureBlackbox offers a number of installation options when it comes to its Delphi Edition. This article intends to provide a quick summary of the differences between them and help you decide which one to choose for your project.
The Delphi edition is shipped in three packaging variants:
- SecureBlackbox 2024 Delphi Edition (the default variant)
- SecureBlackbox 2024 Delphi Edition - Backwards Compatibility Pack
- SecureBlackbox 2024 Delphi Edition - Source Code
SecureBlackbox 2024 Delphi Edition (the default variant)
This package follows the traditional way of packaging Delphi components by /n software. It includes a selection of v2020-style classes (the new API), such as TsbxPDFSigner, TsbxSFTPClient, and TsbxHTTPServer. The components are implemented as wrappers around an external DLL library, which makes them easy to install and deploy. It also supports all versions of Delphi, starting from Delphi 6 (excluding Delphi 8), and will likely continue to support future Delphi versions.This variant also supports the option of incorporating the SecureBlackbox DLL into Win32 executables as a resource (DRU) file, thus removing the need for the DLL dependency. Declare the NO_USESECUREBLACKBOXDLL conditional in your project to enable this mode. This option, however, comes with an added risk of provoking the DEP in Windows 10, so please take extra care when using it.
The installation package is ready to use with any Delphi version.
This package supports the following targets: Windows (32 and 64 bit), Linux (64 bit only), macOS (64 bit only), Android ARM (32 and 64 bit), and iOS.
SecureBlackbox 2024 Delphi Edition - Backwards Compatibility Pack
This package delivers SecureBlackbox functionality in the way similar to the one used in earlier versions (16, 15, etc.), hence the name. The installation includes a selection of v2020-style classes (the new API), as well as v16-style components inherited from earlier versions (TElPDFDocument, TElSimpleSFTPClient, TElX509Certificate). Both sets of components are shipped in the form of precompiled .dcu files. Architecturally, the v16-style components work as a backbone for the v2020-style classes, so both sets of components provide the same level of support for security protocols and standards.Besides the .dcu files, each BCP distribution includes .hpp and .obj files that can be used with the matching version of C++ Builder. For example, SecureBlackbox 2024 Delphi Edition - Backwards Compatibility Pack Delphi 10.2 Tokyo includes .obj and .hpp files that can be used with C++ Builder 10.2 Tokyo.
Due to the large cumulative size of the .dcu files and the need to supply an individual set of .dcu files for every Delphi version and platform, we split the BCP distribution into a number of separate downloads, one per Delphi version. Please pick the download that matches the version of Delphi you work with. The individual distribution includes a set of .dcu files for every target platform supported by that version of Delphi (unless it's old and not in use anymore, like 32 bit macOS). For example, the setup package for Delphi 10.4 Sydney includes .dcu files that target Windows (32 and 64 bit), Linux (64 bit), macOS (64 bit), iPhone (64 bit), and Android ARM (32 and 64 bit).
The SecureBlackbox Backwards Compatibility Pack does not register paths to the units in the IDE. You can add them manually by going to Project -> Options -> Delphi Compiler and adding the following directory to your search path: C:\Users\<User>\Documents\SecureBlackbox 2024 Delphi Edition - Backwards Compatibility Pack\code\<Delphi Version>\<OS>.
This package supports the following versions of Delphi: 7, 2007, XE (1-8), 10.0-10.4, 11, 12. Support for future Delphi versions will be added upon their release. There is also a separate setup file for FreePascal (3.2.0), with Windows, Linux, and macOS platforms supported.
SecureBlackbox 2024 Delphi Edition - Source Code
The Source Code package contains the Pascal source code that matches the set of .dcu files offered by the Backwards Compatibility Pack package. You need a special kind of license to access this package.Differences in Licensing
Depending on which variant of the Delphi Edition you are using, you may need to use slightly different methods to provide your license:SecureBlackbox 2024 Delphi Edition (the default variant)
- On a system with a development license installed, create an empty Delphi project, put any SecureBlackbox component on the form, and check its RuntimeLicense property. This will give you your Runtime Key. The runtime key is a long alphanumeric string: 53424446..0000. Copy this string to a safe place and discard the project.
- In your real project, assign your runtime license back to the RuntimeLicense property of every SecureBlackbox component that you use in your code:
sbxHashFunction.RuntimeLicense := '53424446..0000';
This will untie your project from your development system and will let it run normally on other computers.
SecureBlackbox 2024 Delphi Edition - Backwards Compatibility Pack
- On a system with a development license installed, create an empty Delphi project, put any "v2020-style" SecureBlackbox component on the form - TsbxHashFunction will do - and check its RuntimeLicense property. This will give you your Runtime Key. The runtime key is a long alphanumeric string: 53424446..0000. Copy this string to a safe place and discard the project.
- If you are only using the v2020-style API in your project ("Tsbx***" components), assign your runtime license back to the RuntimeLicense property of every such SecureBlackbox component that you use in your code:
sbxHashFunction.RuntimeLicense := '53424446..0000';
This will untie your project from your development system and will let it run normally on other computers.
- If you are using the v16-style API in your project ("TEl***" components), add the sbxcore unit to the uses clause of your main form/project, and assign your runtime license to the RuntimeLicense property
of every SecureBlackbox component that you use in your code, both v16-style and v2020-style:
sbxHashFunction.RuntimeLicense := '53424446..0000';
ElHashFunction.RuntimeLicense := '53424446..0000';
Note: while it is mandatory to assign the runtime license to all v2020-style components you are using in your project, it is enough to only assign the runtime license to the one v16-style component that is being used the earliest into your program's run (the rest of the v16-style components should pick it up from there). This makes it possible to provide your license using a dummy v16-style component at the very start of your application's process:
with TElX509Certificate.Create(nil) do
  try
    RuntimeLicense := '53424446..0000';
  finally
    Free;
  end;
However, if unsure, your best choice is assigning it to each and every SecureBlackbox component used in your project. Please also keep in mind that while it is enough to pass your runtime license to just one v16-style component, you still need to provide it to each and every v2020-style component you are using.
SecureBlackbox 2024 Delphi Edition - Source Code
No license needs to be provided if you are using SecureBlackbox in the source code form.
Side-by-side Installation and Conflicts
We do not recommend installing several variants of SecureBlackbox 2024 Delphi Edition side by side. This is because all the variants contain identically named components, which, unless the IDE is configured carefully, may lead to various cross-variant conflicts. Please take extra care when switching variants on the same system to avoid any leftovers from the old variant affecting the workability of the new variant. Please make sure that you uninstall any existing SecureBlackbox 2024 Delphi Edition variants before proceeding to the installation of the new variant.Supported CAs
With decades of evolution behind them, X.500-based public key infrastructures - which run behind the scenes of pretty much every digital certificate that you use in your online life, be it your personal email certificate, a qualified certificate that you use to submit your company's tax returns, or a TLS certificate that enables your web server with the HTTPS capability - have become pretty uniform and comprehensively standardized.
What this means for you is that in most cases you can use SecureBlackbox components with certificates that originate from all sorts of Certification Authorities (CAs) across the world, both commercial and maintained by PKI enthusiasts. From certificate chains issued by global trust providers, such as Verisign or GlobalSign, to startup-spirited Let's Encrypt, to in-house and in-lab CAs powered by Microsoft Certificate Services or OpenSSL - SecureBlackbox can work with any of them.
Yet, newer digital signature standards built on top of X.500, such as PAdES or XAdES, often come with their own bespoke flavours. This is particularly true for national certificate infrastructures. While ETSI has made every effort to create a uniform framework for digital signatures, little (or big) differences in legislation across different countries lead to differences in their own subvariants of digital signature frameworks. While countries A and B may both employ the same PAdES (or XAdES) format for their tax documents, the actual documents used in country A may be quite different from their counterparts from country B. The differences may be quite dim (such as the order of attributes in the signature blob) or more substantial (such as the need to use a certain cryptographic algorithm or property).
Here at SecureBlackbox we aim to support and embrace that diversity. The last thing that we want is to make our customers find themselves alone in a struggle with a complicated technology, which, worse, is quite often poorly documented. We understand that, de facto, the global Internet is home for a plethora of slightly different PKI and signature ecosystems, many of which deviate from or violate the standard they are supposed to comply with. We find it normal, given the young age of the technology and the somewhat chaotic process of its development. We aim to work with it, not fight it - at least not at our customers' expense.
SecureBlackbox supports the absolute majority of modern global and national CAs and digital signature variants. This includes, but in no way is limited, to:
- Verisign
- Thawte
- DigiCert
- GlobalSign
- ADACOM
- Certum
- e-Guven
- Entrust
- Equifax
- Fina (HR)
- GeoTrust
- GoDaddy
- Microsoft
- Adobe
- PostSignum
- QuoVadis
- Starfield
- Symantec
- Tübitak
- USERTrust
Supported HSMs
SecureBlackbox supports most modern hardware security modules and online key vaults that are capable of talking via PKCS#11. These include global and national cryptocard vendors. The below list includes vendors that we support. The list is in no way exhaustive, so even if the vendor of your device is not present in the list, it is very likely that we support it too.
- Athena
- ACS
- AKIS
- Bit4id
- CloudHSM
- eToken
- Feitian
- Gemalto
- HID
- iKey
- NSS (Mozilla)
- Osobna Iskaznica (HR)
- RSA/ePass
- SafeNet
- Tübitak
- YubiKey
Common Errors
This page covers the most popular errors stepped on by our customers and relevant approaches to their resolution.
TLS certificate validation failed: error 75788; the connection will be terminated
This error can be returned by any component involved in TLS activity - either directly (like HTTPClient) or indirectly (like PDFSigner, which may use TLS when connecting to a timestamping service). It indicates that the TLS certificate presented by the server didn't pass the chain validation procedure.
One of the most common reasons for the TLS certificate to fail validation is that its chain doesn't lead to a trust anchor - a root or CA certificate explicitly trusted in the system. This may happen for a variety of reasons, with the most popular being an outdated or missing list of trusted certificates in the system. For example, ageing Windows XP or Windows Mobile systems are unlikely to have trust anchors capable of validating modern web site certificates.
This is also the default case on Linux which, unlike Windows or Mac OS, does not have a concept of system-wide trusted certificates. This means that on Linux you must supply the list of trusted certificates to the component manually to make TLS connections work.
Finally, your company's internal test or file servers are unlikely to have their certificates trusted in the system. You might want to "pin" them to your component to connect to them smoothly.
See the Validating TLS Certificates article for more details about validating certificates in TLS components.
'Invalid Certificate Data', 'Invalid size', or 'Invalid file format (possibly not a PEM?)' exceptions when loading a certificate in a Delphi application
Sometimes, when running your application from the Delphi IDE, you may observe one or more of those exceptions. In most cases they do not indicate that anything is going wrong and do not affect the flow of your application. Your certificate is most likely well-formed and good for use.
These exceptions are thrown, and caught, by SBB itself, internally, to facilitate and control certificate processing. You can only notice them when running your application under a Delphi debugger, but not when running it standalone outside of it.
The next time one of these exceptions stops the execution of your program, tick the 'Ignore this exception type' checkbox on the exception dialog before clicking 'Continue'. This will tell the debugger to never stop on it again. Note that as certificate processing may throw several different exceptions, you might need to repeat this procedure for every such exception: EElCertificateError, EElASN1ReadError, etc. There are only a few of them (4 or 5) but once you've done this procedure for all or them you will no longer see them.
A SecureBlackbox-powered Delphi application crashes on startup. A 0xC000007B or 0x0EEDFADE error is sometimes returned.
This error affects the standard variant of the Delphi edition (not the Backwards Compatibility Pack), and is a symptom of DEP kicking in. It may happen on some target systems but not on others.
More systems are gradually enforcing DEP these days, which, unfortunately, may clash with the way SecureBlackbox packages its functionality by default.
One guaranteed way to avoid this problem is to switch to the external DLL deployment mode when distributing your SecureBlackbox-driven application. You can do that by defining a USESECUREBLACKBOXDLL conditional globally when compiling your project, and including secureblackbox24.dll in your deployment package.
Tips and Tricks
The guidance in this chapter provides useful information on the common aspects of SecureBlackbox component usage.
Validating TLS certificates
Certificate validation in TLS-able components
All TLS-capable components in version 2024 are configured to automatically validate server certificate chains against the local trust settings. This setup is different to that in versions 16 and earlier, where the users were ultimately responsible for implementing and integrating the entire validation part.
The main reason behind that change was the observation that many SecureBlackbox users implemented the validation piece improperly, or were not performing the validation altogether. The outcomes of incorrectly implemented validation routines were a false sense of security and strong potential for the compromise of the entire secure communication channel.
This default setup comes with two major implications:
First, any TLS endpoint you are connecting to has to be trusted in the local system for the connection to be successful. This means that the TLS certificate of the server endpoint has to chain up to a trusted root anchor. If the component fails to build that chain - for example due to the root certificate not being found or not being trusted - the following error will be returned:
TLS certificate validation failed: error 75788; the connection will be terminated
Please see the Troubleshooting section below to learn how to deal with TLS chain validation issues.
Second, the chain validation outcomes may differ when run on different systems - even if you are connecting to the same endpoint. Older or isolated systems may not have up-to-date information on trusted certificates, which will ultimately lead to chain validation failures.
One important remark that has to be made in this context concerns Linux. While Windows and Mac both have concepts of system-wide trust settings - for example, Windows does that through the extensive mechanism of system certificate stores - Linux doesn't operate system-wide trust lists. Instead, every application that wants to validate TLS chains on Linux has to deploy its own set of trust anchors, and use it for building and validating third-party certificate chains.
SecureBlackbox partially addresses that matter by downloading missing root certificates on-demand from Windows Update. While this approach does its job in enabling connectivity with most public web sites across most connected plaforms, it may be unsuitable in certain scenarios. Please see the Tuning Up Chain Validation section below to learn about fine-tuning the validation routine in the client-side TLS endpoints.
Troubleshooting
Read along if you are concerned about chain validation issues due to the above or similar errors.The first step when you come across a chain validation problem is about establishing the root cause. Chain validation is a complex, multi-step routine that involves validation of up to a dozen digital signatures and retrieval of up-to-date certificate status information from numerous CRL and OCSP responders. While certain failures in that chain of checks may be tolerated, others may be fatal for the validation routine.
The most popular reason for the chain validation to fail, especially in development/debug environments, is the use of locally untrusted certificates. Any certificates that you generate for yourself, by using SecureBlackbox or third-party tools, are likely to be untrusted as they do not chain up to a trust anchor. Any attempt to use the component to connect to TLS services that use such certificates will lead to the certificate validation error (which really is a manifestation of the component guarding your security, effectively rejecting connections to an untrusted endpoint), and you need to take steps to make such connections possible.
A good place to start with the investigation is the chain validation log. This is a very detailed step-by-step record of actions the component took to establish the validity of the server's certificate, with their respective outcomes. In any version 2024 component the log can be accessed via the <component>.ConnectionInfo.ValidationLog property. The log is available for both successful and unsuccessful connection attempts, and can be checked as soon as the OnTLSCertValidate event fires. If using a version 16-style component, subscribe to its OnCertValidatorFinished event and read the log from the CertValidator.InternalLogger.Log.Text property.
The log should give you the idea of the root cause for the validation error. Search for the first entry that reports the validity as INVALID. The accompanying comment will provide the details. Note that there might be more than one reason for the same validation to fail, and you must deal with all of them.
Good to know. If you come across the SELF-SIGNED validity for any of the chain elements, this is a good indicator that the validation has failed due to the corresponding root certificate being untrusted in the system. You might be able to fix the validation by registering the certificate as trusted - see the Tuning Up Chain Validation section below.
Among the most typical reasons for chain validation failures are:
- Untrusted root certificates - mostly observable in test/development environments
- Missing root certificates (often happens on older/isolated systems)
- Unavailability of revocation sources due to e.g. network restrictions
- Certificate not suitable for use with the network endpoint (endpoint address or certificate key usage mismatch)
Good to know. You can temporarily disable certificate chain validation for debug purposes. This is a good option if your development/testing environment relies on untrusted certificates, and that fact slows down or inconveniences your development activities. You can disable the validation by setting <Component>.TLSSettings.AutoValidateCertificates to false (<Component>.AutoValidateCertificates in v16-style components), subscribing to the OnTLSCertValidate event, and returning Accept=true from the event handler.
Note that you should only disable the validation for testing and development purposes. Doing so in a production application undermines its security, and may lead to breaches and loss or disclosure of sensitive data.
Tuning Up Chain Validation
SecureBlackbox's certificate chain validation module is highly-customisable and can suit any imaginable requirement. Among the configurable validation aspects are:
- Revocation checking: prioritize one method over the other (OCSP in favour of CRL) or disable revocation checks entirely.
- Provide your own sets of trusted and known certificates - handy on Linux and other environments with no built-in trust settings.
- Offline mode: one-switch cutout of any online validation activity.
- Easy certificate pinning.
Customizing revocation checks
Use the <Component>.TLSSettings.RevocationCheck property to configure revocation checking. The property allows you to choose and prioritize between different combinations of OCSP and CRL mechanisms. Generally OCSP is better suited for TLS connections due to speed, making crcAnyOCSPOrCRL the recommended option.
You can fully disable revocation checks by setting this property to crcNone, in which case only the validity of the chain will be checked, but not the current status of the certificate.
Providing additional certificates
Use the <Component>.TrustedCertificate and KnownCertificates properties to provide the certificates to complement the default lists offered by the system. This may be particularly handy in environments that don't have their own system-wide certificate trust lists. On Linux, for example, you can borrow the root and CA certificates that are included with Firefox or Chrome distributions, and make them available to SecureBlackbox by adding them to these collections.
Certificate pinning
Certificate pinning is effectively telling the TLS component that a particular certificate is explicitly trusted - even though it doesn't chain up to a trust anchor and has no reference in the revocation sources. Certificate pinning is often used in intranet environments which don't rely on global trust lists offered by public CAs.
Pinning a certificate is as simple as adding it to the component's TrustedCertificates collection.
Bespoke validation
In some cases you may need even more fine-grained control over the validation. In this case you may consider switching off the internal mechanism used by SecureBlackbox by default, and implementing the validation routine manually. The CertificateValidator component may come handy in doing that.
The internal routine can be switched off by setting <Component>.TLSSettings.AutoValidateCertificates to false, and subscribing to the OnTLSCertValidate event. Inside the event handler you need to perform the validation in accordance with your bespoke requirements. The server certificate object and any accompanying chain can be accessed via the <Component>.TLSServerChain collection. The server's certificate itself always comes first in this collection, and the rest of the chain follows.
Having completed the bespoke validation routine, adjust the event's Accept parameter in accordance with the validation result.
The CertificateValidator component may be very helpful in implementing the bespoke validation routine. It allows you to tune up the validation process to the minute detail, and provides such features as offline validation, cache control, and timeout setup.
Summary
Certificate validation is a crucial component of the overall security provided by the TLS connection. Please set it up responsibly to make sure your secure channel is really secure - and SecureBlackbox will take care of the rest.
Configuring TSA authentication
Configuring TSA service authentication
Some TSA services require connecting clients to authenticate themselves. They may want to do so to limit anonymous connections, or to provide timestamping services on a paid basis.
TSAs normally use one of the following methods to authenticate requestors:
- HTTP authentication (basic, digest, or NTLM)
- TLS certificate-based authentication
To authenticate to services that rely on HTTP authentication, provide your credentials straight in the URI:
pdfsigner.TimestampServer = "http://user:password@timestampserver.com";
Use the following three steps to implement authentication with a TLS client certificate:
1. Subscribe to the OnTLSCertValidate event. This event fires on an early stage of every TLS connection established by the component. In most cases the connection to the TSA service would be the only TLS connection established by the component during the signing operation. However, in certain cases the component may need to connect to other services, mainly CRL or OCSP responders, too.
2. In the event handler, check the ServerHost and ServerIP parameters to confirm that the connection is made to the TSA.
If the host name doesn't match the TSA's, exit the event handler. Otherwise, check whether the server
asked you to authenticate using the TLSClientAuthRequested config property:
string authReq = signer.Config("TLSClientAuthRequested");
3. If the authentication has been requested, add your client certificates to the TLSClientChain collection. The component will do the rest.
You can load the certificate using the CertificateManager or CertificateStorage classes, depending on its location. Note that the server may be configured to expect the entire certificate chain and not only the signing certificate - in which case add the whole chain to TLSClientChain, starting from your end-entity certificate.
Signing with external keys
Signing with External Keys
While built-in support for keys managed by CryptoAPI, PKCS#11 drivers, KMIP, and Azure Vault covers the majority of signing scenarios, in some cases signing keys cannot be accessed via those standard mechanisms. Among the exceptions are devices or services that use proprietary signing APIs, or those located in isolated environments and requiring specific access routes.
SecureBlackbox allows you to leverage such keys by utilizing one of its two external signing facilities. Each of the options is tailored for specific signing scenarios. Read on to learn more about each option and find out which one would be appropriate in your circumstances.
The simpler, synchronous option is based on the SignExternal() method, and works as a simple wiretap into the signing routine. This method follows exactly the same procedure as Sign() does, but when it comes to performing the actual signing it fires off the OnExternalSign event and requests the signature from your code, instead of calculating it by itself. It then incorporates the signature into the document and completes the operation.
Since this method works sychronously, it requires the signing service/device to be accessible at the time of signing, and be capable of returning the signature within the same execution context. This method may be an optimal choice if your signing device or service is accessible in real time. Most hardware devices and signing services offering REST/SOAP connectivity satisfy this requirement.
This option is supported by the majority of SecureBlackbox components, including PDF, Office, XAdES and CAdES signers, TLS-capable clients and servers (for certificate-based authentication), MailWriter, and DCAuth.
The more sophisticated, asynchronous option is based on the SignAsyncBegin()/SignAsyncEnd() pair of methods. The asynchronous signing method consists of three isolated steps:
- On the first, pre-signing stage you set up your signing component (e.g. PDFSigner) as required and call its SignAsyncBegin() method. This method outputs a pre-signed document (think of it as a document with a placeholder for the future signature), and an async request which contains the hash that needs to be signed. At this point you may release the signing component and terminate the pre-signing process.
- On the second, hash signing stage you use the DCAuth component to process the async request.
This may happen on the same system where you performed the pre-signing step, or on a different system.
DCAuth extracts the hash from the async request and signs it with the designated key, producing
the async response which contains the signature.
The signing key can be taken from one of the standard locations (a file, PKCS#11 device, or CryptoAPI store), or used externally via the DCAuth.OnExternalSign event.
- On the final, completion stage, you instantiate your signing component (e.g. PDFSigner) again, and pass the async response produced by DCAuth earlier, together with the pre-signed document that you obtained on the pre-signing stage, to its SignAsyncEnd() method. SignAsyncEnd() extracts the signature from the async response and embeds it into the pre-signed document, thus producing a fully signed document.
The asynchronous method is more appropriate for scenarios which need to run in different execution contexts. Two examples of such scenarios are where there is some user interaction involved (e.g. the user needs to type in a PIN or authenticate to a web site with a browser), or where the signing result is not available immediately (e.g. is submitted asynchronously to a separate web endpoint).
This option is supported by most SecureBlackbox signing components: PDFSigner, XAdESSigner, CAdESSigner, and ASiCSigner.
SAML: Using Okta, OneLogin, and other identity providers
SAML: Using Okta, OneLogin, and other identity providers
SAML Identity Providers come in all shapes and sizes. You might need to tweak your SecureBlackbox SAML SP server to make third-party providers work with it in the best possible way. This help article aims to provide some guidance on configuring third-party IdPs and setting up your SBB-powered SP server to work with them. The setting therefore comprises of two primary players: a third-party IdP service (such as Okta) and your application that uses SecureBlackbox's SAMLSPServer class to consume the external IdP services.
Note that the SAML ecosystem is developing rapidly, and some facts given in this article may have become obsolete by the time you read it. While we are doing our best to keep this information relevant, please allow for a certain degree of error. This data is correct as of January 2022.
In the examples below we assume that your SP server runs at http://myserver.com, with the AssertionConsumerService and other endpoints published at the /sp subpath (e.g. http://myserver.com/sp/AssertionConsumerService). If you would like to use a different setup, please alter the settings accordingly. You might need to alter them at both sides, SP and IdP.
Okta
Okta supports SAML 2.0. The integration process is very straightforward, and is covered in this article: https://help.okta.com/en/prod/Content/Topics/Apps/Apps_App_Integration_Wizard_SAML.htm . You will need an Okta development account to create SAML integrations.
The Okta IdP endpoint can be configured manually without the need for an SP metadata file. Pass the URL of the Assertion Consumer Service that you have set up in your SP endpoint as the "Simple Sign on URL" setting:
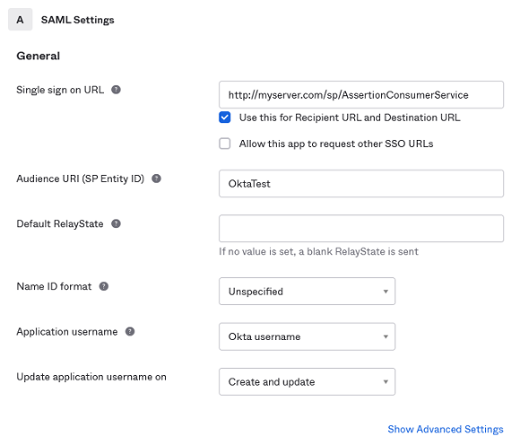
If required, please expand the additional settings section by clicking on the Show Advanced Settings link. This lets you set up specific security mechanisms to use. It is a good idea to download the Okta certificate on this stage, as you may need it later for validating signatures.
When asked whether you are a customer or a software vendor, tick the radio button indicating that you are a software vendor looking to integrate your app with Okta.
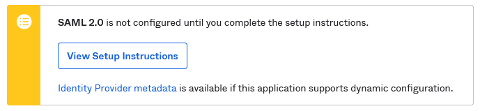
Having completed the application setup, please download the IdP metadata by clicking on the corresponding link:
You will need to pass this file to the LoadIDPMetadata() method of your SP server to let it know about the Okta IdP settings.
Finally, please register some user accounts with your new SAML integration by navigating to the Assignments tab and clicking the Assign to People button. You need at least one user account registered with the integration (otherwise you will have no users who could sign in to your SP!)
This completes the IdP setup. Please now set up your SP server as below. This is one of the possible setups;
Okta is quite flexible and generally will accept a number of integration configurations:
  server.SPToIDPBinding = csbtRedirect;
  server.AssertionConsumerServiceBindings = "POST";
  server.PreferredIDPToSPBinding = csbtPOST;
  server.SingleLogoutServiceBindings = "Redirect,POST,Artifact";
  server.SignAuthnRequests = true;
We have only indicated the integration settings that matter for Okta. Remember to set other properties (such as AssertionConsumerService or SigningCertificate) as required.
You are now ready to start the SP server and try the connection. When you navigate to a protected resource in your browser (e.g. http://myserver.com/picture.jpg), the SP server should redirect you to the Okta portal that will present you with a login form. After receiving valid credentials from you, the portal will generate an authentication assertion and redirect you back to the SP web site - which should now display the requested resource.
OneLogin
OneLogin has limited support for SAML. Some types of accounts only have access to SAML 1.1-based IdP, which is quite outdated and does not provide many features that a newer SAML 2.0 provides. Yet, you still can use it with SecureBlackbox SP server to build identity integrations. You will need a OneLogin developer account to create SAML integrations.
In your Onelogin dashboard, go to Apps, then Add Apps. Search for "SAML" and select the SAML 1.1 Test Connector (Advanced) from the list. Having added the app, go to the Configuration tab and set up the SP URLs. You can use the same URL for all the ACS endpoints:

You can leave the remaining properties at their default values. Download the IdP metadata XML by clicking the More Actions button at the top of the page and picking SAML Metadata entry from the list. You need to pass this metadata file to the LoadIDPMetadata() method of your SP server object to share the IdP settings with it.
Remember to add at least one user account for your integration to work.
Now, please set your SP server up as below. This is not the only possible setup: you can
tune up both the IdP and SP settings to enable encryption or tune up signature settings.
  server.SPToIDPBinding = csbtRedirect;
  server.AssertionConsumerServiceBindings = "POST";
  server.PreferredIDPToSPBinding = csbtPOST;
  server.SingleLogoutServiceBindings = "Redirect,POST,Artifact";
  server.SignAuthnRequests = true;
Remember to make sure the AssertionConsumerSetting of your SP server matches the one that you configured in your OneLogin app.
You can start the SP server now and try requesting a protected resource. If everything has been set up right, you should be redirected to the OneLogin authentication portal that will ask you for credentials. Once you have provided your credentials, the portal will redirect your browser back to the SP server.
Azure AD
Microsoft Azure Active Directory service supports SAML 2.0. One thing that makes it different is that the Azure IdP service does not support XML metadata files as means for provision of SP and IdP endpoint settings. The SAML settings therefore need to be configured manually (read on).
Microsoft provides excellent guidance into registering your application with Azure ID and configuring it:
https://docs.microsoft.com/en-us/azure/active-directory/manage-apps/add-application-portal
https://docs.microsoft.com/en-us/azure/active-directory/manage-apps/add-application-portal-assign-users
https://docs.microsoft.com/en-us/azure/active-directory/manage-apps/add-application-portal-setup-sso
The process, however, is slightly different for non-gallery applications. Specifically, the Enable Single Sign-on feature is not available through the route suggested in the article. Instead, the configuration wizard suggests that you use the Dashboard - Azure Active Directory - App Registrations setting instead. This does the job.
Below we narrowed down a summary of steps that you need to take to register your application with Azure AD.
- Create a new application in the Azure AD console: go to Enterprise applications; then click New Application, and then Create your own application.
- Choose Register an application to integrate with Azure AD (App you are developing) from the three options offered.
- Choose the types of users that can use this application, as required.
- Add any user accounts that you would like to manage with this IdP.
- On the Authentication tab of your application, configure the Redirect URI to point to the AssertionConsumerService endpoint of your SP:
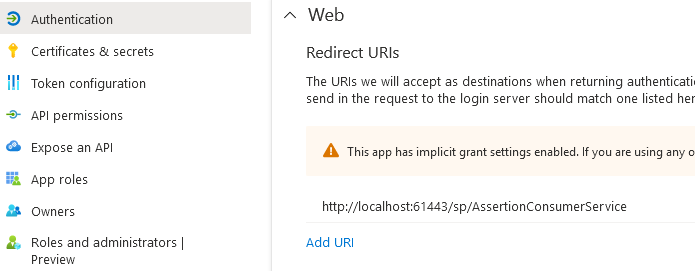
Note that Azure only accepts ACS addresses that begin either with https:// or with http://localhost. While other IdP services do tolerate local IP addresses in the URLs (such as http://127.0.0.1), you must use the domain-based addressing with Azure.
You can also provide the logout URL. This should be public, i.e. accessible from the Azure AD service.
- Take a note of your application's SAML endpoints by clicking on the Endpoints button at the top of your application's setting page.
Although Azure lists a number of endpoints, only the last two make sense for SAML. They are identical:

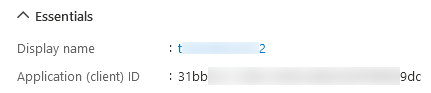
- Also, take a note of the ID that Azure has assigned to your application. You can get it from the Application (client) ID
entry in the Essentials tab of your application's settings.
- This completes the IdP setup. The rest is about configuring the SAML SP server in your application. As we already mentioned,
Azure does not provide an XML metadata file, so we will need to set up the parameters in code. Here are the parameters that you
need to set up (remember to set up the primary SP properties too, such as URL, AssertionConsumerService, and signing certificate):
  server.SPToIDPBinding = csbtRedirect;
  server.AssertionConsumerServiceBindings = "POST";
  server.PreferredIDPToSPBinding = csbtPOST;
  server.SingleLogoutServiceBindings = "Redirect,POST,Artifact";
  server.SignAuthnRequests = true;

  server.Issuer = "31bb...9dc"; // your application ID as shown in the Azure dashboard
  server.Config("IDPSSO=https://login.microsoftonline.com/3269...8d7/saml2"); // the SAML endpoint as shown in the dashboard
SPID
SPID (https://demo.spid.gov.it) is a quite demanding Identity Provider. Regulated by the Italian government, it requires a number of adjustments to be made to the SP server component for it to be accepted. Still, with careful tune-up you can still make it work for you.
Note: you can only let SPID know about your SP server by passing your metadata to it. At this time we have no information whether there exists an alternative (manual) way of doing it. You can only pass the metadata as a URL at your SP - which means the SP must be up and running by the time you are registering it with the SPID IdP.
The overall setup procedure consists of the following steps:
- (pre-requisite) Grab the IdP metadata XML by clicking the Scarica Metadata IdP button. You will need to pass it to the LoadIDPMetadata() method of your SP server object.
- (pre-requisite) Generate a signing certificate compatible with SPID. The easiest way to do that is to use the gencert-private.sh script available at https://github.com/italia/spid-compliant-certificates. Note that the certificate must mention the real URL of your Service Provider (the IdP will reject your requests if it does not match).
- When setting up the server, make sure to load the certificate you have generated using a CertificateManager object and assign it to the signing_certificate and meta_signing_certificate properties.
- Adjust the server properties in accordance with the snippet below (all the settings are mandatory; adjust values as required):
server.SPToIDPBinding = csbtRedirect; server.AssertionConsumerServiceBindings = "POST"; server.PreferredIDPToSPBinding = csbtPOST; server.SingleLogoutServiceBindings = "Redirect,POST,Artifact"; server.SignAuthnRequests = true; server.SignMetadata := true; server.Config("OrganizationName=My Organization"); server.Config("OrganizationDisplayName=My Organization"); server.Config("OrganizationURL=http://myserver.com"); server.Config("OrganizationLang=it"); server.Config("SigDigestMethod=http://www.w3.org/2001/04/xmlenc#sha256"); server.Config("SigMethod=http://www.w3.org/2001/04/xmldsig-more#rsa-sha256"); server.Config("UseZeroIndexForDefaultServices=true"); server.Config("WantAssertionsSigned=true"); server.Config("ContactPerson=Company=My Organization, sro;Email=myserver.com;Type=other;Extension.https://spid.gov.it/saml-extensions.VATNumber=IT122345678;Extension.https://spid.gov.it/saml-extensions.Public="); - Start the SP server. Check that it publishes metadata correctly by navigating to http://myserver.com/sp/metadata in your browser. If you can see the metadata XML, you are all good and ready to register your service with the IdP.
- Go to the SPID page (https://demo.spid.gov.it/) in your browser and click the Registra Metadata Service Provider button. Paste the metadata URL (http://myserver.com/sp/metadata) in the Metadata URL box and click the Download button. The IdP should now download the metadata from your SP endpoint and process it.
- Note: With the demo endpoint the registration process ends here. Unfortunately, not being an Italian entity, we cannot test the registration any further. Still, most of the coupling work has been done by this stage. The only task that remains is setting up the users at the IdP side and testing your SP by navigating to one of the resources it protects.
Trying and testing your SAML SP setup
SAML SP endpoints are expected to be available publicly on the Internet to be reachable by their IdP counterparts. This sometimes makes it difficult to test them, as development systems are often hidden from the online public by routers and firewalls.
One of the options to test SP endpoints is to relay a port on the public router to a locally running SP endpoint. There are a few tools and tips that may be helpful in that regard.
- Dynamic DNS (DDNS) services can bind a fixed DNS name to the volatile public IP address of your router. Instead of referencing your SP by the IP address of the router, you can get a name like myownsp.ddns.net and have the DDNS service deal with the IP address changes.
- To let "outsiders" get to an SP service running on your development system, you need to relay, or forward, a public port on the router to the listening port on your development system. The common way of doing that is called "port forwarding", which is configurable in the router settings (look for "port forwarding", "firewall", or "NAT" settings). Note that the public port number does not need to match the port opened on your development system: for example, you can forward a public port 80 (HTTP) on the router to port 15080 on your system. When the IdP makes a request to myownsp.ddns.net:80, the router forwards that request to port 15080 on your development system (e.g. 10.0.1.75:15080). That happens transparently to the IdP, which thinks it is talking to myownsp.ddns.net:80.
- An alternative way of letting outsiders access your system is by using application-layer forwarding. One example of that is
a service called localhost.run. This service lets you create a reverse SSH tunnel to your SP endpoint and makes it available for
others as a subdomain at the localhost.run service:
// OpenSSH
C:\> ssh -R 80:localhost:15080 nokey@localhost.run

// PuTTY
C:\> PLINK.EXE -ssh -l nokey -R 80:localhost:15080 localhost.run
Everybody, including public IdPs, can now access your local SP endpoint by sending requests to http://06f129bd133176.lhr.life. You can now configure the IdP to use this address too:
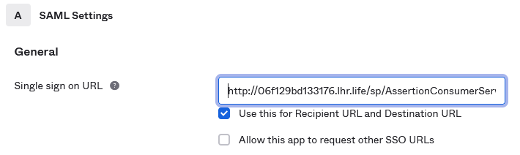
- Understand your ports! As port forwarding involves different port numbers, please make sure you sort them out right. Make sure
the IdP knows about your public port (80 in the above example), not your private port (15080). This is particularly
important where you provide the SP details to the IdP through the metadata file. The metadata that the SP component generates
uses its Port setting - which is normally assigned to the private port on your development system. If the public port number that
you intend to use is different to your private port number, please make sure you pre-generate the metadata file with the public
port number before you start the server:
  // setting up primary server properties
  server.URL = "http://myserver.com";
  server.AssertionConsumerService = "/sp/AssertionConsumerService";
  server.SPToIDPBinding = csbtRedirect;
  ...

  // setting the public port number
  server.Port = 80;

  // exporting metadata that mentions port 80
  server.SaveMetadata("my_metadata.xml");

  // switching the port to actual private number
  server.Port = 15080;

  // starting the server
  server.Start();
Handling and virtualizing operations in SecureBlackbox servers
Handling and overriding server operations using the Three-Step Virtualization
Most of the server components shipped with SecureBlackbox are highly customizable, allowing the user to override or alter the way the clients' requests are handled by default. The customization feature paves the way for creation of bespoke or virtualized server solutions that work over standardized protocols.
The possibility of customization is typically offered through a three-step virtualization model. Every customizable operation or request that can be handled by the server - say, RenameFile - is represented with a triple of events:
- BeforeRenameFile
- RenameFile
- AfterRenameFile
The first event fires right after the respective request has been received from a client. It provides the details of the operation, such as the original and target file names, and, importantly, a by-reference (writable) Action parameter. The event handler can set the Action parameter to one of the three settings given below. The setting chosen defines the further operation flow:
- fraAuto: the operation shall be handled automatically by the server: in this case, a file will be searched in the provided local directory and renamed.
- fraCustom: indicates that the user wants to take care of the operation by themselves. If this setting is chosen, the server takes no action, and instead fires the RenameFile event shortly after BeforeRenameFile completes. The user is expected to handle RenameFile and perform the requested action - that is, rename the file - manually.
- fraAbort: the operation should be aborted as not supported/allowed. Neither the server nor the user are expected to perform it.
The second event (RenameFile) only fires if Action was set to fraCustom in the earlier call to BeforeRenameFile. It lets the user handle the requested operation in the way they want. The user code must fulfil the operation (for example, rename a database entry, if building a virtualized server), and return the operation result as the event's OperationResult parameter.
If the Action parameter was set to fraAuto, RenameFile is not called. The server performs the operation automatically.
The third event, AfterRenameFile, fires upon completion of the operation, either in automatic or custom mode. The user code can check and/or adjust the result to be returned to the client.
To summarize:
- If Action is set to fraAuto, the next call about this operation will be to AfterRenameFile.
- If Action is set to fraCustom, the next call about the operation will be to RenameFile, and after that to AfterRenameFile.
- If Action is set to fraAbort, the operation is rejected and no further calls about it are performed.
Tuning up memory management
Tuning up memory management
SecureBlackbox uses several techniques to optimize and improve memory performance. One of those is the use of a built-in, high-performance memory manager in SSH/SFTP and TLS components. While the memory manager helps significantly reduce the overall memory footprint in high load environments, its efficiency depends on certain co-operation on your code's behalf, which, if not done correctly, may result in an opposite adverse effects (memory usage creep). Read on to learn how to adjust your code to make the most of the memory manager.
The instructions below only apply to .NET edition and the v16-style ("legacy") API. If you are using a different product edition or the new-style API they don't apply to you: in non-.NET, non-v16-style-API scenarios the memory manager adjusts itself automatically. The things are different for that particular combination because of the specifics of the .NET GC.
For the SecureBlackbox SSH/TLS memory manager to work efficiently you must dispose of any transport components
explicitly as soon as you do not need them anymore:
  TElSimpleSFTPClient client = new TElSimpleSFTPClient();
  try
  {
    client.Open();

    // do the job
    // ...

    client.Close();
  }
  finally
  {
    // make sure to dispose of the object when you are done with it
    client.Dispose();
    client = null;
  }
Not disposing of the objects may lead to creeping memory use. If you notice that your project consumes more and more memory over time, the reason might be about the worker objects not being disposed of properly. This can be particularly noticeable in server implementations that have to handle many client connections over long periods of time.
Which components should be disposed of?
The memory manager is used by most of the lower-level TLS- and SSH-based components:
- TElSSHClient
- TElSimpleSSHClient
- TElSftpClient
- TElSimpleSFTPClient
- TElSSHServer
- TElSftpServer
- TElSSLClient
- TElSSLServer
- TElSimpleSSLClient
- TElHTTPSClient
- TElSimpleFTPSClient
- TElDTLSClient
- TElDTLSServer
Note: The "simple server" components (TElSimpleSSLServer, TElSimpleSSHServer etc.) manage the lifetime of the worker components internally. You do not need to dispose of them - but you can if you want to.
Note: The memory management applies exclusively to the worker transport components. You do not need to dispose of any associated or helper objects such as TElSSHKey, TElSSHMemoryKeyStorage, or TElX509Certificate.
I cannot or do not want to dispose of the objects and my project keeps eating memory. Are there any other solutions?
The other option is to disable the memory manager altogether. If you do so, you will leave it up to the .NET GC to perform any necessary memory cleanups. With the memory manager deactivated you will no longer need to dispose of the objects explicitly - just let them get out of scope as normal, and the GC will take care of them.
Use the following code to disable the memory manager (or re-enable it, if needed):
  // for SSH-based components
  SBSSHCommon.Unit.SSHMemoryManager().Enabled = false;

  // for TLS-based components
  SBSSLCommon.Unit.SSLEnvironment().MemoryManager.Enabled = false;
Setting up Microsoft Entra ID authentication
Setting up Microsoft Entra ID authentication
Trusted third-party authentication mechanisms that rely on technologies such as OAuth2 are becoming increasingly popular. This article elaborates on steps that you need to take to set up Microsoft Entra ID authentication for connecting to SMTP, IMAP, POP3 and other Microsoft services.
This article assumes that you are familiar with general OAuth2 flow. Please see OAuthClient if you don't feel confident about it.
We are basing this document on the guidelines that Microsoft provides in their (article). However, the article is missing some important details, which we try to compensate for below.
To be able to authenticate using Microsoft Entra ID, you will need to register an 'application' in their control panel first. This is not about creating a traditional application (.exe), but rather about registering an application entity in Microsoft Entra ID (the authentication service).
Please start with signing in to your Microsoft control panel and completing the steps described in this article . By the end of this process, you will have a fresh Entra ID app registered with Microsoft. Copy the Application (client) ID to a safe place, you'll need it later.
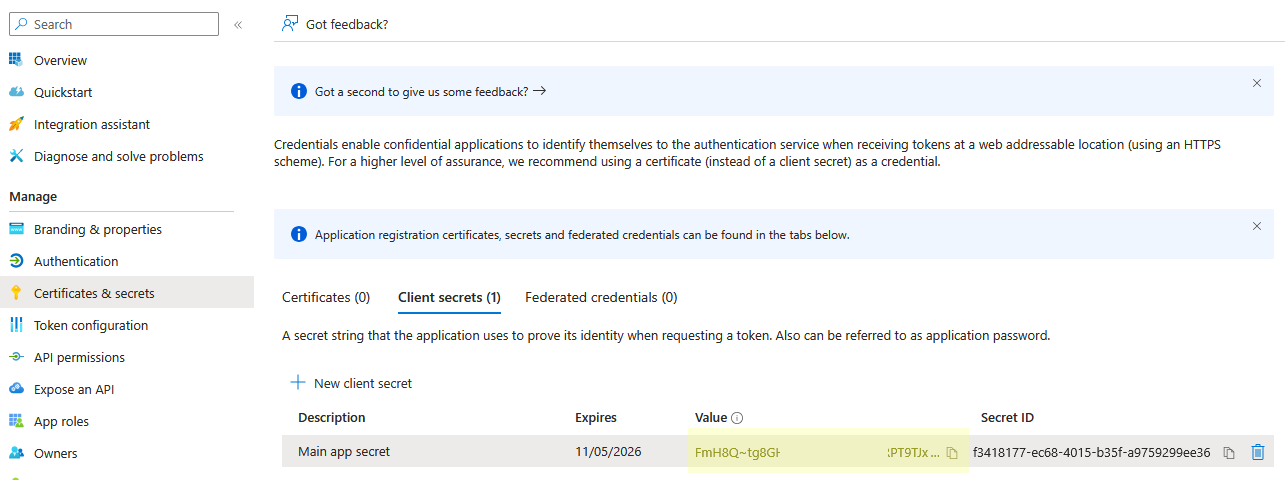
Having done that, click on Add a certificate or secret link opposite the Client credentials item. This will take you to a new page where your application's keys can be accessed. Click on the New client secret button. Choose a descriptive name for your secret (such as Main app secret), the desired validity period, and click Add. A new secret will be generated. Copy the secret to the safe place next to the Application ID. You will need this pair to authenticate to the OAuth2 server.
The only thing that remains is to add the Redirect URI. This is the address that your application (now, the .exe) will use to capture the authorization token from the MS OAuth2 server. This is typically assigned as an HTTP or HTTPS endpoint at a local address (127.0.0.1) and a sufficiently unique port. Since recently MS requires that an HTTPS endpoint is used.
So, click on the Add a Redirect URI link, and then Add a platform. Choose the Web option; then type https://127.0.0.1:17800 (use any vacant port to your likeness) in the text box:
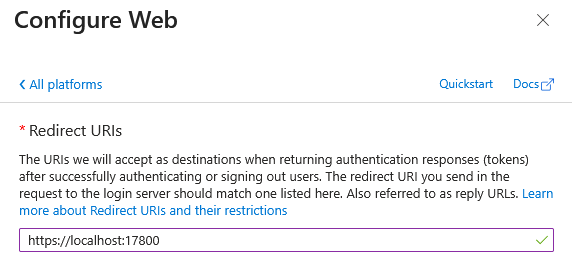
Note: Microsoft, alongside other OAuth2 integrators, have recently been discouraging from using the Web application platform, due to insufficient level of protection it can provide for the client secrets. The use of Mobile and Desktop Application platform, which relies on more secure PKCE flow, is now recommended.
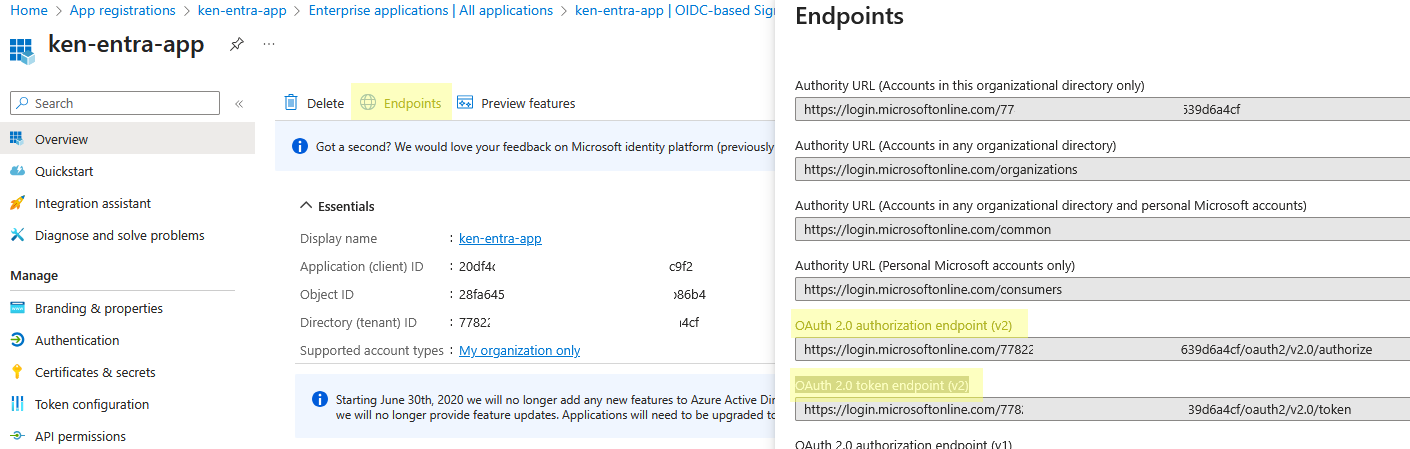
While still in the control panel, take the opportunity to check the URLs of the authorization servers. These may differ depending on whether your application is a single-tenant or multiple-tenant one. Navigate to the Endpoints link in the top menu on the application Overview page, then copy down the values in the OAuth 2.0 authorization endpoint (v2) and OAuth 2.0 token endpoint (v2) boxes:
Your authentication mechanism has now been set up. You can proceed to using it in your application.
Scopes
When requesting authorization tokens in your application with OAuthClient object, you must specify the desired access scope. Choose the scope basing on the service that you intend to use:
- IMAP: https://outlook.office.com/IMAP.AccessAsUser.All
- POP3: https://outlook.office.com/POP.AccessAsUser.All
- SMTP: https://outlook.office.com/SMTP.Send
  // Use the credentials and URLs from the service's control panel
  oauth.AuthURL = "https://login.microsoftonline.com/778...39d6a4cf/oauth2/v2.0/authorize";
  oauth.TokenURL = "https://login.microsoftonline.com/778...39d6a4cf/oauth2/v2.0/token";
  oauth.ClientID = "20df...c9f2";
  oauth.ClientSecret = "mH8Q...";

  // Optionally set the scope as instructed by the service
  oauth.Scope = "https://outlook.office.com/SMTP.Send offline_access";

  // This must match the redirect URL set up in the control panel
  oauth.RedirectURL = "https://localhost:17800";

  // For HTTPS endpoints, a TLS certificate/chain needs to be set up.
  // This example uses a one-time certificate, but you may consider handling this more
  // carefully in real-world applications to avoid browser trust warnings.
  // CertificateManager mgr = new CertificateManager();
  mgr.CreateNew(ctX509Certificate, "tls", "127.0.0.1");
  mgr.Generate(2048);
  oauth.RedirectURLChain.Add(mgr.Certificate);

  // Making the authorization call.
  // This will launch the browser and navigate to the service's authorization page.
  // Upon successful authorization the tokens can be retrieved
  // from AccessToken and RefreshToken properties.
  oauth.Authorize();

  Console.WriteLine("Access token: " + oauth.AccessToken); // Save these!
  Console.WriteLine("Refresh token: " + oauth.RefreshToken);
If using PKCE (Mobile and Desktop applications platform), set the PKCEMode config to s256 and do not set ClientSecret. No other changes are needed.